After seeking some advice from the Vans Air Force forum about my errant dimple, I spoke with the factory, and they didn't seem to think it was a big deal... so I gently flattened and deburred the bad hole, dimpled the good one and continued building. I did some research on fillers, and will probably use either aluminum body filler or ProSeal to repair the flaw. No hurry on that decision.
The next step was to start priming parts. I stuck by my decision to leave alclad parts bare.

I riveted the rear spar assembly together, and had to find a torque wrench calibrated in inch/lbs before I could tighten the bolts holding the rear bearing assembly to the rear spar. My search turned up Performance Tool, an impressive tool store not far from my local Harbor Freight. So I went to both stores and got two high-quality torque wrenches for my tool collection. Riveting the front spar together was slightly trickier than I thought it would be... especially since I used a couple rivets of the wrong length. Another lesson learned: double, triple and quadruple check your rivet specs. I had to drill a few out, but the replacements turned out fine.


I added the inboard ribs next. Tricky access; replaced a couple rivets.


I mocked up the skeleton one last time before working on riveting the skins.


The first step in skinning the horizontal stabilizer is to rivet the middle nose ribs to the top of the skins. It was possible to do this myself, but it would have demanded a very awkward reach with both the bucking bar and the rivet gun. For the first time I decided that I wanted a helper to buck the rivets, so I enlisted the help of Mike Oswald. Mike is a friend who used to own a recording studio, and we've worked on numerous sessions together. He is also a former USAF powerplant mechanic, and although he never worked on airframes, I knew he would be an apt student. We went over the basics of riveting, and assembled some test pieces I had fabricated for the occasion before starting work on my ribs and skins. We started with the right side, and the first two rivets we chose went well. The third rivet was the infamous front nose rivet; this is the one that is a problem for a lot of beginning builders because the skin is under tension, and it's hard to get the two pieces together tightly when setting the rivet. On our first attempt, there was a slight gap between the rib flange and the skin, and I thought we should do better than that. Drilling out the rivet created another mistake... as the factory head gave way, the skin tension popped the pieces apart. The rivet shank was still firmly set in the rib flange, and when I tried to continue drilling it out, the bit slipped off the shank and contacted the rib. I ended up having to drill out the other two rivets and removing the rib from the skin in order to remove the stuck rivet shank, and when I finally got it out of there I realized I had drilled another half-hole occlusion of the original hole.

The resulting oval was too large to fix by drilling out to #30 and using an "oops rivet". Needless to say, I was a bit miffed. We stopped working, went inside and did some research on the VAF site to see if there was any way of salvaging the part. The skin hole was slightly enlarged but still usable... but I wasn't feeling good about that rib. I decided to put off the decision, and we went ahead and attached the left center nose rib to the left skin top. We figured out a way to preload the skin to keep it tight on the front rib flange, and this installation went well. After more mock-ups with the skeleton in a couple configurations, we got the bottom blind rivets set for the left middle rib, and called it a day. Of course this was a Saturday, so Vans was closed. I eventually decided to replace the right nose rib. This meant waiting for delivery and doing the additional prep work and priming, but it was worth the peace of mind. That front rivet is a critical one; I didn't want it compromised.
In the meantime, I went ahead and finished skinning the left side, which went smoothly. I learned how to buck the small rivets along the front spar by feel, pressing the flat side of the bucking bar against the shop head with just two fingertips. There were a few that I needed to touch up, but no mistakes or drill-outs.
In the meantime, I went ahead and finished skinning the left side, which went smoothly. I learned how to buck the small rivets along the front spar by feel, pressing the flat side of the bucking bar against the shop head with just two fingertips. There were a few that I needed to touch up, but no mistakes or drill-outs.


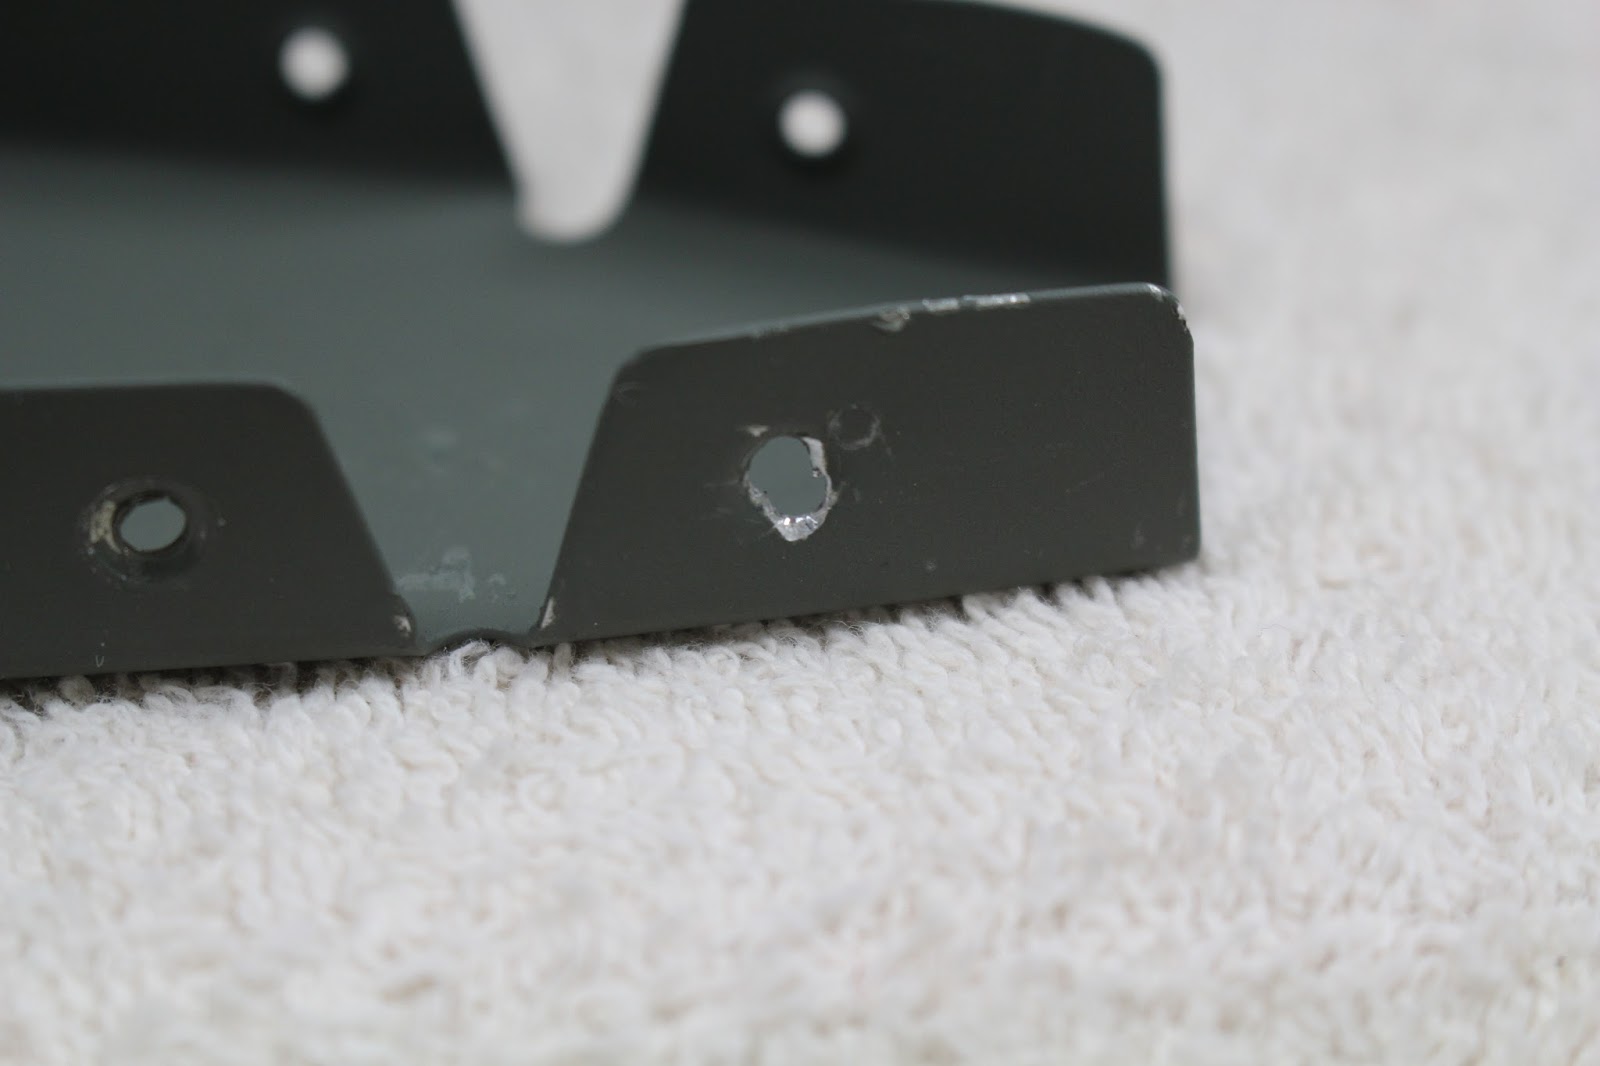
I chose Priority Mail for the delivery of the replacement nose rib, and it arrived very quickly. After prepping and priming, I called Mike up and got it safely installed on the right skin, top and bottom. Note in the photo, there is a missing blind rivet on the bottom; I caught that and installed it later.

I continued with the right skin installation, and only had one other minor issue. After clecoing the skin to the front spar and ribs and riveting the skin to the front spar, I set the blind rivets that join the middle ribs to the front spar. This is tight access for the blind rivet puller, and you have to determine proper seating of the rivet by touch as best as possible. I set the center of the three pulled rivets, and it felt fine... but after setting the other two, the center blind rivet was sitting just a bit proud. This might have been caused by my removing all the clecos from those three parts before pulling the center rivet. The top and bottom rivets are very good, and although the center one's factory head is just a hair off the center rib flange, it's very tight; there's no movement in the rivet... and there's no way I was going to try and replace it with the skin already riveted to the front spar. I made a mental note to discuss it with a Tech Counselor on my first inspection.


I continued installing the right skin. One aspect of this that somewhat complicated the process was that I needed to flip the part several times as I worked. I didn't want to take any chances on twisting or bending the front spar assembly, so I had to cleco the rear spar in place every time I wanted to move the part... including every other hole along the top & bottom skins. I had to do that three or four times before I got all the rivets set for the right skin.


At this point, it was time to schedule my first Tech Counselor visit. Although not a FAA prerequisite, as a first time builder I was wisely advised to have an EAA Tech Counselor inspect my work before I riveted the rear spar in place and closed up my horizontal stabilizer permanently. I did some research and found three candidates in the area, two of which were fellow members of EAA Chapter 113. Daniel Jones keeps his RV-9 in the chapter's hangar, and is the recommended Tech Counselor for Van's RV projects. He contacted me and we scheduled a visit for the following Saturday.
I had a few days to wait, so I set the horizontal stabilizer aside and got busy on the vertical stabilizer. I clecoed the skeleton together and match-drilled all spar and rib holes, disassembled the parts and fluted, straghtened and deburred the ribs. I clecoed the skin on, match-drilled the skin holes and finished deburring all parts. Then came another disassembly, dimpling the skins, spars and ribs, and countersinking the spar doubler. I prepped and primed all non-alclad parts and set them aside to prepare for the Tech Counselor visit.


Dan's visit was friendly and informative. He had a lot of good things to say about the work I had done and how I approached the project. He did give several helpful suggestions about riveting and deburring. In general my rivets looked good, but I was just on the edge of undersize on some of my shop heads. I told him I had thought underdriving was better than overdriving, and he agreed... but ideally the rivet gauge should just barely fit over the shop head. I was making sure the gauge had no play around the rivet, but I learned it's better to overdrive very slightly than underdrive a shop head. I have since adjusted my technique accordingly for both the rivet gun and the squeezer. I asked him about that slightly proud blind rivet on the right side, and he agreed it's best to leave it as is. He also gave some good pointers on deburring, and we discussed it at length. The fingernail test is the best test for a sheet metal edge: if your fingernail detects the slightest burr, work the part just a bit more. He recommended getting some jeweler's files and some special Dremel pads for working the tight corners, and did a good job of explaining potential causes for stress cracks. We also talked about painting, and I explained my stance on not painting alclad parts. He understood... but he suggested that the exposed ribs and spars on the empennage would have been better off being primed, especially since I'm planning to paint the exterior of my aircraft. There is also the issue that corrosion usually begins where two parts meet. After our discussion, I think I'm going back to my first plan of priming all ribs, spars and stiffeners, and not priming the interior alclad skin surfaces of the closed parts.
He spent a little over an hour here, and I think we both could have continued our conversation much longer than that. He gave me a written inspection report, and insisted that there was no charge for the inspection. In fact, he even refused my offer of gas money for the trip out to my house. Instead, he offered to take me up in his RV-9; I could help share the cost of fuel, and he could spend some time with me going over the details of his airplane and his building experience. All I can say is, I can't wait!


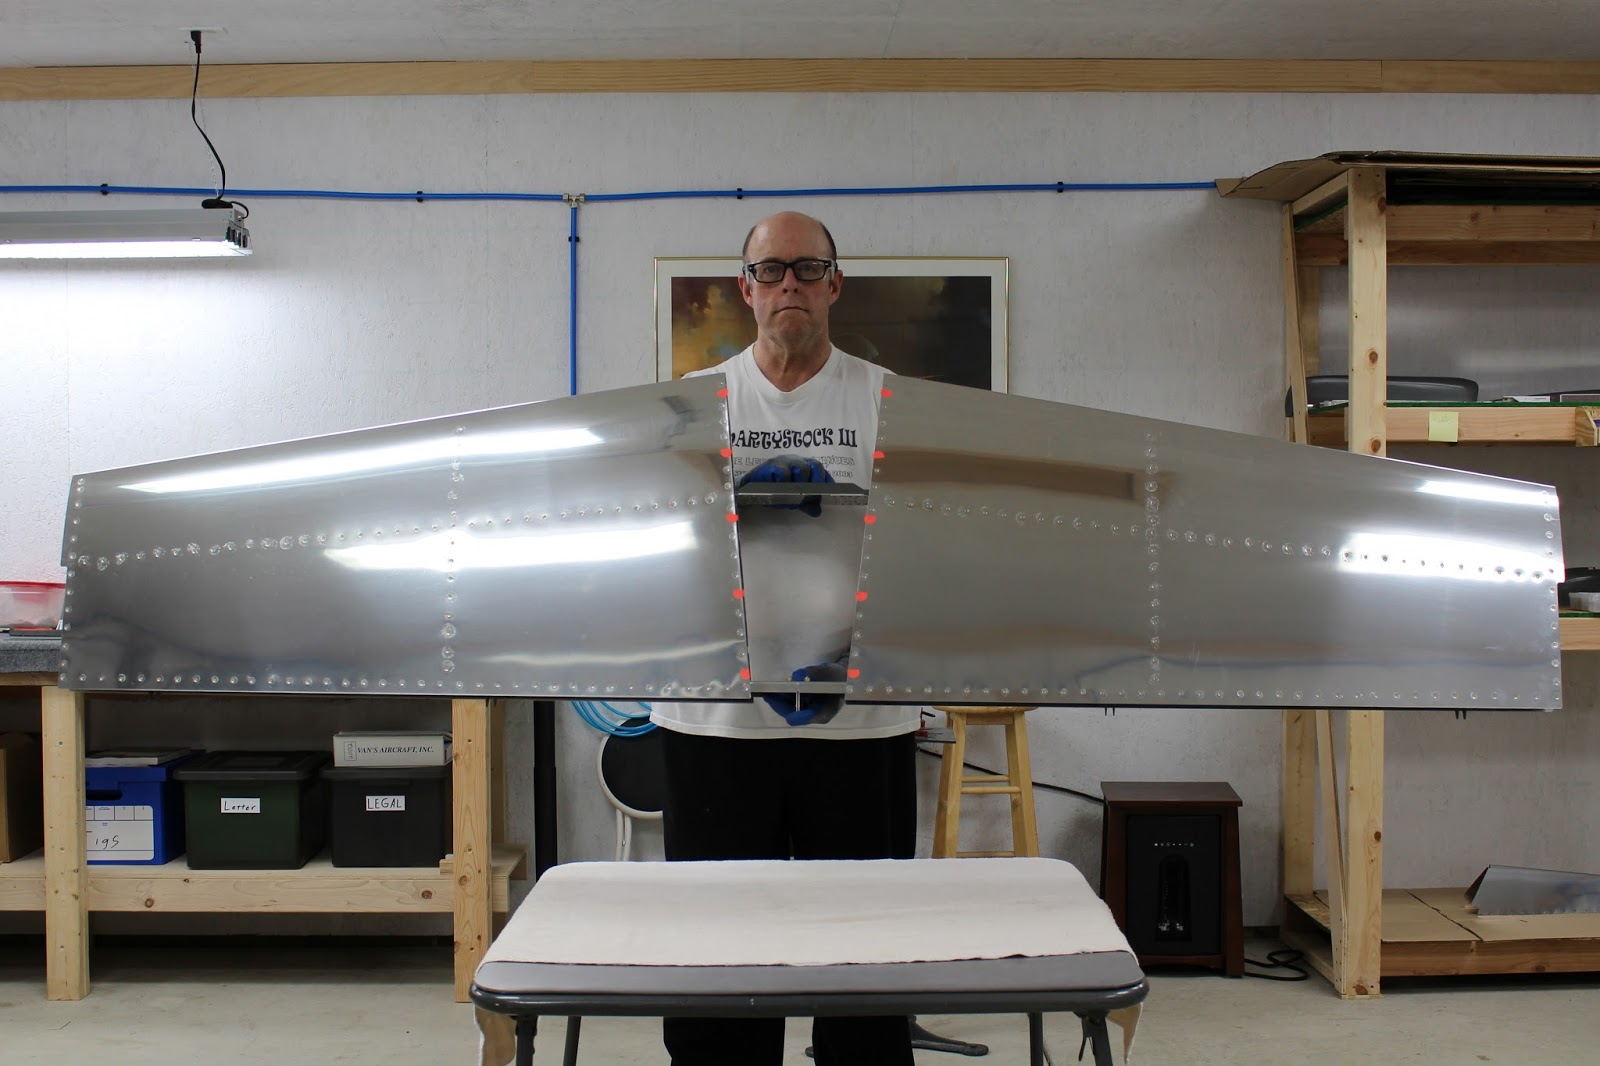
The next day I got an early start. I unbolted the center hinge bearing assembly from the rear HS spar assembly prepped and primed the exterior side. While it was drying, I prepped and painted the remaining VS ribs and spars. Then I was able to insert the HS rear spar, cleco it and rivet it into place. I bolted the center hinge bearing assembly back in place, torqued it to the proper specs... and with that, my horizontal stabilizer was complete. I laid two foam cushions and a drop cloth on one of my folding tables, placed the assembly on the cushions and covered it for storage.


There was still time left in the day, and I was still motivated, so I got back to work on the vertical stabilizer. I riveted the spar doubler and hinge brackets to the rear spar, completing that assembly. The paint was dry enough to handle, but not completely cured, and working with it was dicey. I had a couple of rivets that needed to be fixed, but that went well. Before I left the shop for the day, I checked out the front spar primer, and resprayed some flaws in the finish.
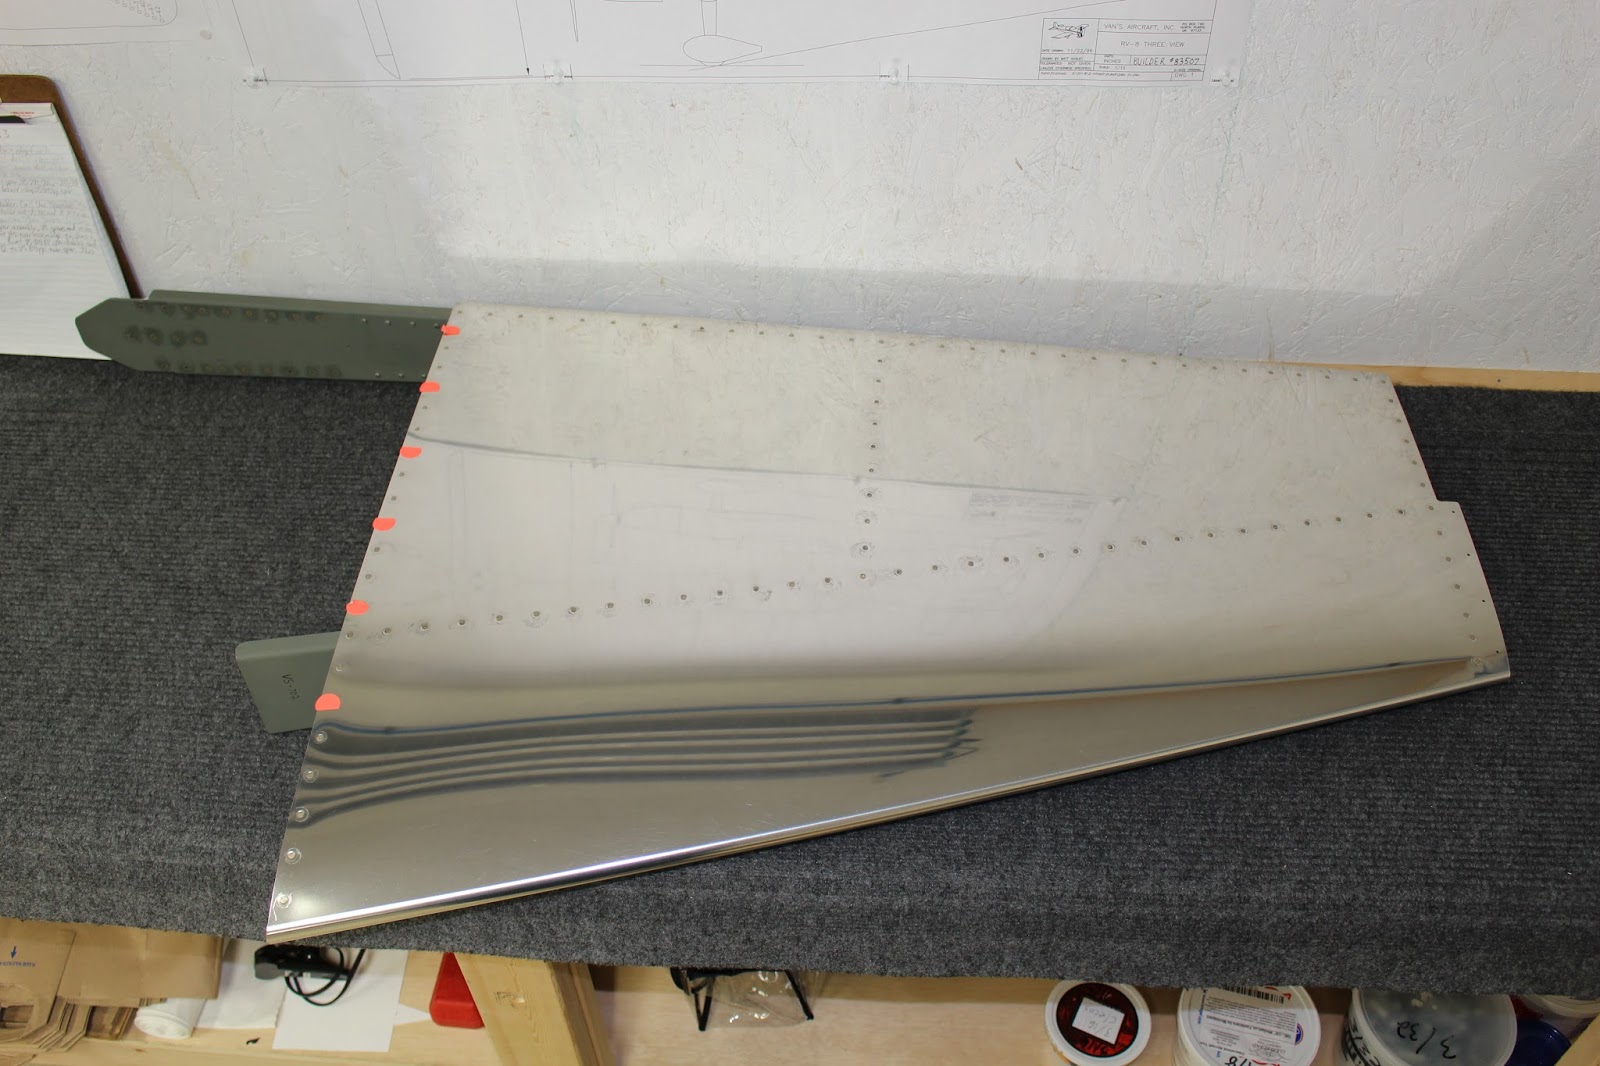
That Sunday had been a long and momentous day, and I initially planned to take a break from the airplane for a short period. But the next day, I was still inspired... so I finished the vertical stabilizer in one day. Riveting the ribs to the front spar was a little trickier than I expected, and I had to drill out one badly dinged rivet that I didn't discover until after the skin was on. I also made the classic mistake of neglecting to leave out some of the lower rib rivets for later fairing attachment, but I caught it early and only had to remove two out of twelve. Squeezing the rear spar/skin rivets was also trickier than expected, because of clearance issues caused by the spar doubler rivets and hinge brackets. I had to buck the skin rivets by two of the hinge brackets with the footed bucking bar, because the squeezer just couldn't get all the way in for a clean squeeze. But I got it all done.
That Sunday had been a long and momentous day, and I initially planned to take a break from the airplane for a short period. But the next day, I was still inspired... so I finished the vertical stabilizer in one day. Riveting the ribs to the front spar was a little trickier than I expected, and I had to drill out one badly dinged rivet that I didn't discover until after the skin was on. I also made the classic mistake of neglecting to leave out some of the lower rib rivets for later fairing attachment, but I caught it early and only had to remove two out of twelve. Squeezing the rear spar/skin rivets was also trickier than expected, because of clearance issues caused by the spar doubler rivets and hinge brackets. I had to buck the skin rivets by two of the hinge brackets with the footed bucking bar, because the squeezer just couldn't get all the way in for a clean squeeze. But I got it all done.


So I made two milestones in as many days. I shared all the progress on Facebook and got a surprising amount of interest. I put the vertical stabilizer in storage, and I think that will be it for working on the airplane for a little while. I did get my clothing made, although that took longer than expected, and wasn't without its share of problems. Since I used the VAF logo in my designs, I followed their usage guidelines and made charitable donations to the Warbirds of Glory Museum's Sandbar Mitchell Restoration fund and the CAF's kickstarter program for the restoration of the C-47 "That's All, Brother" that led the D-Day invasion.

The last thing I had to do was get caught up on this blog. Now that's done, and I can focus on all the work I need to do for AirVenture. I am really looking forward to this year, even more so than previous years, because it will be my first year as an actual airplane builder, and I'm looking forward to meeting many of the new aviation friends I've made recently. My event social calendar is filling up.... the two-day SportAir Van's RV Builders Workshop; other workshops and seminars; the VAF Social; The Van's Banquet; the EAA Chapter 113 gathering; meeting Kermit Weeks and looking for many other flying acquaintances that may be attending. It will be wonderful staying in the Hilton Garden Inn during the first two nights, and getting an early bird's selection for my Camp Scholler site. Even the trip there will be special, because I'm taking the S.S. Badger ferry from Ludington to Manitowoc. So much more pleasant and fun than driving around Lake Michigan and through Chicago... I'm really looking forward to it.
I even managed to finish this blog the day before July 1st, so as a monthly blog, I'm staying right on schedule. It sure does make for long entries, though... but I still think it's all worth the effort. I hope you do, too.
I even managed to finish this blog the day before July 1st, so as a monthly blog, I'm staying right on schedule. It sure does make for long entries, though... but I still think it's all worth the effort. I hope you do, too.