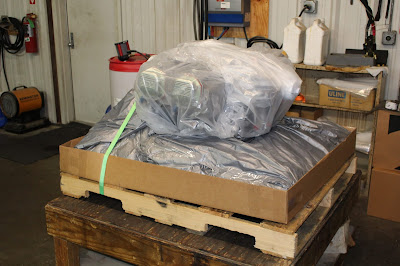
At 11:30 p.m. on Thursday evening, November 17, I climbed in to my packed and prepped Ford Explorer, started it, turned on the iPad and booted up Google Maps, turned on the Garmin Virb action camera in time lapse mode and started recording, entered the address for Barrett Precision Aircraft Engines in the Garmin Drive 50 GPS and pushed GO, cued up the Stephen Bennett playlist on the iPod, cued up the Bob and Tom Show podcast on my iPhone and pushed play, put the car in drive... and drove. It would be a long slog there and back; 1920 miles in under 44 hours. It would have been easier and cheaper to have the engine delivered to me; that had been the original plan. But that plan was based on the premise that would have been late summer or early fall and I'd be in the thick of final assembly. Winter had begun and progress was reduced to minor details. And I needed this road trip. I was still reeling from the loss of Ted Gauthier and a long road trip would do me good. I would have an excellent weather window for the entire trip, I would have the engine in my possession sooner and would have complete control over the transport process. So off I went, rested and ready. The only stops I made were for gas and restrooms; the ride was beautifully uneventful and I arrived at Barrett's shop at 1:00 p.m. local time on Friday afternoon. The engine was already packed for transport; it took a couple hours to load it, strap it down, go over the paperwork and write the check before heading to my hotel in nearby Claremore. I got my room settled and walked over to the Rib Crib for an excellent dinner. Watched the sunset and a beautiful moonrise from my room while processing photos and video before going to bed early and sleeping soundly for eight hours. I awoke at 2:30 a.m. Saturday morning and was on the road by 3:15. The original plan was to drive home non-stop, but with the early start I was ahead of schedule. I had time to stop in St. Louis to check out the Gateway Arch and still make it home in time to make a beer run before the store closed. I had hoped to take the tram to the top of the Arch but their schedule was booked into the afternoon, so I just walked the grounds and marveled at the immensity and grandeur of the amazing structure, enjoying the beautifully clear winter morning. The rest of the drive was smooth; I avoided the Chicago Gauntlet by cutting through south suburbs until I approached the Indiana state border. The rest of the ride went well; traffic was better than expected overall and I tolerated the long trip much better than anticipated. I was home before 8:00 p.m. safe and sound. Sunday morning I offloaded the engine onto the engine table and tucked it away in the hangar. It was back home.


For the next few days I worked around the house, getting caught up and assembling the trip photos and video clips into the Barrettrip III Movie. Along with voiceovers and photos, it shows what it looks like to drive a Ford Explorer at a calculated 9000 miles per hour. Here's a link:
Barrettrip III Movie The engine was hung back on the aircraft with the able assistance of Curt Martin. It was just as much of a pain in the butt as it had been the first time, but it was good to see it back on the airframe.

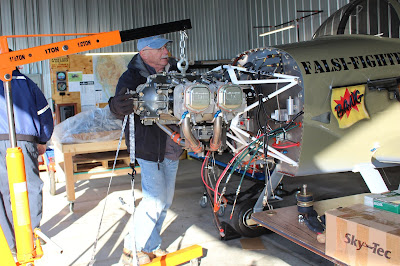


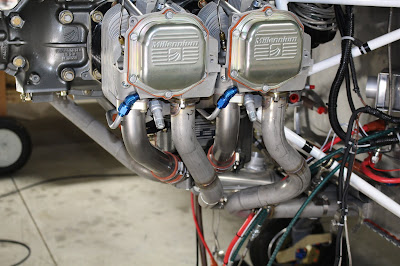
It might seem that reinstallation would be a lot easier than it was the first time, but that's not necessarily the case. Much of the required fabrication is done, but refitting everything is a complex series of tasks and in some cases more difficult to redo. I had to study the way I had done it before to make sure I got it right, but the first attempts included a lot of wrong turns and false starts that would not be repeated. Despite my requests to reassemble the engine with the brackets installed as I had left them, I got the engine back with all brackets removed. A few of the longer bolts and screws I had used for bracketry were not returned and I had to buy new ones. Installation access for some components was even worse than it was before; I found myself wondering how the heck I managed to do it the first time. And working in the unheated hangar in winter was a lot different than working in the comfort of a heated shop at home. But the work had to be done, along with some required additions and improvements, so I got to work. The exhaust was fitted; the alternator bracket was reattached and the alternator hung; the EGT and CHT probes were reinstalled; the fuel servo, starter, sniffle valve and prop governor were reinstalled; the red cube, fuel lines and various brackets and tabs were reattached; the control cables were firesleeved, reconnected and adjusted; the dehydrator plugs were filled with fresh dessicant and refitted to the upper spark plug holes; the oil temp sensor probe was reinstalled in the oil filter mounting boss and safety wired; the crankcase breather tube was reconnected; the tach sensor was screwed back into the side of the right magneto; P-leads and ground wires were reconnected to the magnetos; ground strap cables were bolted back onto the front and rear of the engine and final rerouting of some wiring was begun.


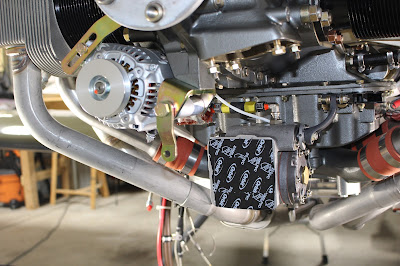


One task that had not been addressed during the first fitting was the installation of an engine preheat system. After considering the available options I chose the Reiff Preheat standard system applicable to my engine. This system consisted of four HotBands heated band clamps that wrap around the base of each cylinder; one HotStrip heating pad that is epoxied to the engine oil sump and a wiring harness for connecting all the components. I needed to install the preheat system before reinstalling the baffling, so the HotBands were installed on the cylinders and the harness was arranged and secured in an optimal orientation. The aft baffles and aft support bracket needed to be notched to create wiring passages and the loom was wrapped in split conduit where it passed underneath the bracket and aft baffles. I had to wait for slightly warmer weather before attaching the HotStrip; more on that later.


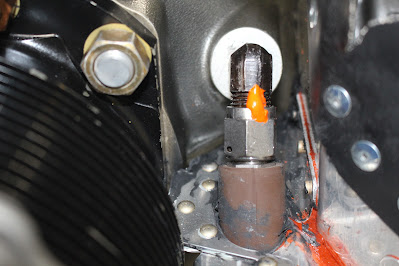
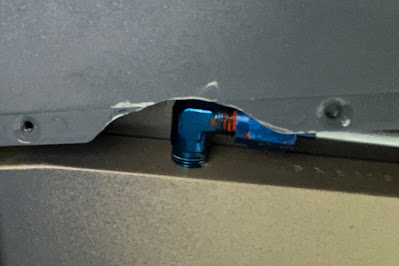
I had removed all fittings from the fuel pump prior to returning the engine to Barrett. When I attempted to refit the fuel lines to the fuel pump I discovered that they had used an angle fitting on the fuel pump inlet during the test run and left it in place when the engine was returned. I needed to refit the elbow fitting I had used for my installation, but when I tried to remove the angle fitting I found it wouldn't clear the oil filter mounting boss. They must have loosened the boss to install the fitting, because there was no way I could remove the fitting with everything tightened in place. Loosening the oil filter boss with the engine mounted wasn't an option; I had to notch the boss slightly and eventually had to cut the tip off the fitting to remove it. Just another major pain, but the job got done and I managed to keep aluminum cuttings out of the pump and off the other engine components. With the correct fitting in place and the fuel hoses connected, routing and connecting wiring continued.


It was time to refit the baffles. After getting both aft baffles loosely fitted, I started with the most difficult part: inserting and tightening the mounting screw that secures the bracket behind the oil fill tube. Access to this area is almost impossible. When the baffles were first installed I was advised to remove the oil fill tube and dipstick to make this job easy, but I was loath to remove a component that Barrett had installed and safety wired in place. I managed to get the screw in the first time, so I knew I could do it again. What makes this especially tricky is that with the baffles assembled the bracket screw hole doesn't align perfectly with the screw hole in the case. The baffle must be pulled upward slightly with all mounting screws loosely fitted to align the holes. I used some wire and the engine hoist to hold the holes in alignment, then experimented with different cobbled-up tools until I figured out what would work best to get the screw started, which is the hardest part. Once the screw is threaded into the case, it was easier to figure out a couple different ways of getting it tightened before releasing the engine hoist tension and removing the pull wire. With that task done, all the other mounting screws and bolts were torqued and sealed.


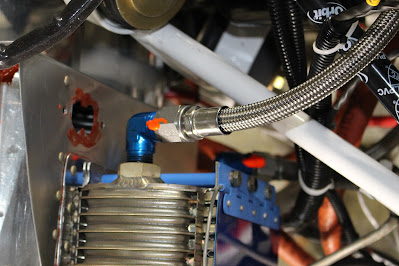
Sensor cables were reconnected before the baffle assembly was completed. The front baffle bracket was installed and the side and front baffles refitted. This was a bit trickier than expected because the valve cover gaskets of the rebuilt engine didn't fit the exact same way that they had during the first assembly. The side baffles had been custom fitted to the original gaskets and some tweaking was required to get the baffles to fit correctly, but it all came together fairly well. With all the baffles and brackets in place, the oil cooler was refitted and the prop governor and oil cooler hoses reconnected. Trying to get the bottom oil cooler hose onto the lower case fitting was another major pain caused by terrible access; it took a number of approaches before I finally got the fitting screwed on. All screws, nuts, bolts and hose fittings were checked, torqued and sealed.


The Reiff HotStrip is glued to the back of the oil sump with metallic epoxy that needs to cure at a temperature of 75 degrees for 48 hours. This isn't an easy task to achieve in an unheated hangar during a Michigan winter. Fortunately this December has been relatively mild and I was able to choose a few relatively warm days to make this task attainable. I experimented with different ways of heating the underside of the engine; results favored using a portable oil radiator heater set up underneath the engine combined with using the HotBands on the cylinders. I purchased an infrared thermometer gun to monitor the case heat; after heating for eight hours the case temperature had stabilized at 60 degrees F. The paint had to be removed from the location on the oil sump recommended by Reiff; the sump and HotStrip were scuffed with a Scotchbrite pad and cleaned thoroughly with isopropyl alcohol. I used an infrared heat lamp to raise the case temp to an average of 80 degrees and warmed the epoxy and HotStrip in my pockets. The epoxy was mixed and applied to the back side of the HotStrip, which was then pressed into place on the oil sump. Additional epoxy was filleted around the perimeter and the HotStrip was further secured with PVC tape. I rearranged the engine blankets and checked the heater cords and component temperatures to make sure the cords were cool, the temperatures stable and everything was safe to leave overnight. An oscillating pedestal fan was also left running to discourage condensation inside the hangar.


While the epoxy was curing, I cleaned the RTV off of the top ignition wires and baffle grommet plates, routed the wires and temporarily installed the plates in the aft baffles. The magneto blast tubes, lower baffle tension rods and heater scat tubes were refitted. The Reiff preheat wires were routed and secured. The intake snorkel and air filter tray were reassembled and all bolts were torqued, sealed and safety wired as needed.


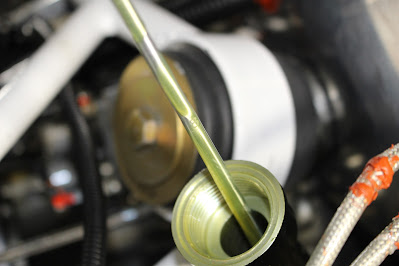
All the engine components were in place; it was time to remount the prop. The crankshaft was carefully rotated to bring the #1 piston to top dead center. I aligned the ring gear correctly, slipped it into place on the crankshaft flange and secured it with temporary Allen head bolts and washers... forgetting that the alternator belt had to be on the inside of the ring gear during installation. Off it came; the belt was placed on the inside and the ring gear refitted. I had planned to tighten and safety wire all the remaining bolts associated with the starter and alternator brackets after the prop was bolted on and the belt could be properly tightened. But examination revealed that access would be very difficult, especially for some of the safety wiring required. I removed the ring gear again and torqued and safety wired the affected bracket bolts before refitting the ring gear for the final time. With the able assistance of Curt Martin and Harry Manvel, the prop was remounted and lightly torqued in place. I borrowed an oversize washer from Curt, adjusted the alternator to tighten the belt and cinched the adjustment bolt before securing safety wire to the adjustment bolt and the alternator blast tube.


At this point I had finally regained the ground I had lost to the nefarious crankshaft AD. It was a beautiful day; the sun was shining, the wind was calm and the ground was dry. I lowered the tail, opened the hangar door and rolled the aircraft outside to sit in the sun while I rearranged the hangar and stowed the engine table and empennage stand. Some friends noticed the plane outside and stopped by to admire the progress. It was really good to see it this close to completion. I basked in the glory for a bit before pushing it back into the hangar and tucking it away for the night.


I weighed the pros and cons of putting the spinner on the prop hub. It really didn't have to go on now; I would only end up removing it again and keeping it off until after first engine start and the airworthiness inspection. But somehow I couldn't resist. I wanted to put the cowling back on as well, but chose to wait until after I ordered and fitted a quick drain plug to the oil sump. While waiting for the quick drain to arrive I puttered through various tasks. I rerouted and secured the upper left ignition wires to keep them away from the upper oil cooler fitting. I got the cowling halves out of the trailer and put some other items back into the trailer for storage. I wanted to make a stand that would help support the lower cowl during installation. One of the components I wanted to use was attached to the cowling table jig, which would probably never be used again, so I dismantled it. Actually, I had to destroy it. It was one of those jigs that evolved in such a way that it could never be disassembled; boards screwed to boards with other boards glued on that covered the screws, etc. I did manage to save a few useable scraps including a carpeted board on a hinge. I removed the roller from an old folding roller stand, cut a scrap stud to fit between the roller tabs and screwed the hinge to the stud. The stand had a stripped out height adjustment screw boss; I used a C-clamp to set a temporary height; eventually it was drilled and through-bolted to the optimal height for supporting the bottom cowl.


When the hangar temperature dipped below freezing, I did some fiberglass work in the comfort of the heated shop. It's been hard to decide whether to try to finish and paint the remaining fiberglass parts, or just get them airworthy. The wheel fairings needed a ridge built up in front of the leading edges of the lower intersection fairings that would direct the airflow over the top and sides of the fairings and prevent it from passing underneath the leading edges. I prepped, masked and reassembled the parts, mixed a filler of epoxy and microballoons and applied a fillet along the leading edge of the lower intersection fairings. Once it had cured, the parts were disassembled and the ridges were sanded and smoothed. I turned my attention to the upper empennage intersection fairing, trimming the edges to the guide lines and smoothed the inner layers at the front top area that contacts the vertical stabilizer.


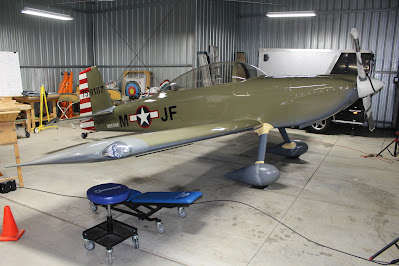
Returning to the engine, I warmed the crankcase and drained the preservative oil from the bottom of the oil sump. The quick drain was fitted, sealed with anti-seize compound and safety wired in place. I added four quarts of Aeroshell 100w mineral oil as recommended for the engine break-in. I wanted the oil to settle completely before calibrating the dipstick. The engine reinstallation was complete but it would be a while before the engine was started, so I decided to refit the cowling. Fitting the bottom cowl was the usual pain, but it went on as it had before. The top cowl was easier, and it was a joy to see the airplane looking so complete. I couldn't resist pulling the aircraft outside for a photo session when the weather cooperated. Some of the photos were taken from a ladder; the resulting perspective makes it look as if I'm photographing a large scale RC model. Trust me... this is the real thing!


When I checked the oil again to calibrate the dipstick, I was surprised to find that Barrett had either calibrated it themselves or swapped my original unmarked dipstick for a marked one. The dipstick obviously hadn't been calibrated with the engine in the tail-low angle of my aircraft stance, so the oil level indication was about 1/4 quart higher than the actual quantity. There wasn't much point in trying to do anything about that right now, so I removed the top cowl and the last four quarts were added. After pre-oiling and the first engine run, I'll see what the dipstick indicates and decide whether or not a different dipstick is worth the bother.


I decided to refit the wheel and wing fairings before finishing the fabrication of the intersection fairings. The tire pressures were checked and brought up to 40 psi before refitting the wheel fairings. I sourced the screws for the wing fairings and got ready to refit them, but when I tried I discovered that something was wrong. The fuel tank attach brackets that bolted to the fuselage interfered with the wing fairings. How did that happen? I was sure all this was pre-fitted during the first wing attach. But there was no question that things didn't fit now. I would either have to re-trim the brackets or notch the wing fairings. I didn't want unsightly bulges along the wing roots declaring my incompetence for all to see; I had enough mistakes on display already. I marked the areas on the top of the brackets that would need trimming, but I didn't remove them yet. Further investigation of photos during wing fitting revealed that I had installed the brackets upside down and on the wrong sides. After priming them, I never marked them R or L because I thought they'd only fit on the correct sides. During final assembly I tried both ways and somehow decided they fit better upside down. A stupid mistake, but at least it could be fixed. Both brackets were removed, swapped, flipped and refitted with the help of Dave Pohl. Another partial disassembly of the cockpit to barely reach two nuts on each side, but Dave got another chance to watch me fumble with safety wire and eventually the job was finished correctly. My builder friends tease me about how many photos I take, but I can't tell you how many times they've helped me recover from mistakes. For a first-time builder, documentation is worth its weight in gold.


The fit of the forward wing fairings was rather tight and it seemed more awkward this time with the plane on the gear and using a creeper. This fitting was still temporary; the purpose being to be able to finish the fabrication of the upper intersection fairings. Those fairings fit the Grove airfoil gear legs better than expected, but they would still require modifications to fit around the larger gear attach brackets. I clamped them in place and got on the creeper to examine the fit and decided to remove the gear pocket covers in order to lay out the trimming required on the fairings. When I began unscrewing the covers I discovered to my horror that there was evidence of brake fluid along the aft edges of each cover. The brake lines... were leaking... AGAIN?! No. No no no no no no no this was not happening. This was not the way this year would end. But there it was: fluid on the previously dry covers. I wiped down each cover, gear leg, fitting and pocket with paper towels. Closer examination revealed that on the right side there was only evidence of brake fluid along the aft edge of the pocket; the leg and fittings were dry. The left side had a drop of fluid suspended on the brake line coupling and wiping it off took the torque seal paint off with it... but the threads of the elbow fitting and the gear leg were both dry. Phew... maybe this wasn't as bad as I thought. After a thorough wipe down, I checked the areas the next day and there was no evidence of further seepage. If there is a leak, it's a very slow one. More testing will be done prior to the airworthiness inspection. I temporarily reassembled the cockpit and got the airplane and hangar ready for display. I was meeting an old friend for a year-end recap and I wanted to show him the current status of the build. Despite the significant amount of work still required and the amount of time it will take, it's really beginning to sink in just how close I am to flying this airplane.


Thus the year draws to a close. 2021 was a crazy year; it seems every year is slightly crazier than the previous one. I expect that to be true of 2022, but in some very good ways indeed. The list is rather short now: finish all the intersection fairings; contact my new DAR Matthew Tomsheck and plan for the airworthiness inspection; pre-oil the engine and perform first engine start; fully assemble the aircraft, empty the fuel tanks and calculate weight and balance; final disassembly and airworthiness inspection; final complete assembly; FIRST FLIGHT. After that, I'll make a quick trip to Texas and spend another day with Bruce Bohannon getting recurrent before coming home and flying my way through Phase 1. Sometime next summer I'll probably finish painting the wheel and intersection fairings and wing tips. But the airplane will fly soon; early spring at the latest. That's pretty soon... so stay tuned!
