Lots of progress in this post, described with words, photos and video links. Let's get to it!
Pre-oiling prep work included removing the cowling and spinner, installing the front seat, pre-heating the engine and securing the installed shoulder harnesses so that they wouldn't be blown around during the first engine start. My EAA Tech Counselor Dan Jones flew his RV-9 up from the EAA Chapter 113 headquarters at 1D2 in Canton to give the engine and airframe a very thorough inspection. I took a lot of notes on his suggestions and he expressed his overall approval of the condition of the aircraft. After he departed I called Rhonda at Barrett Precision Engines to get additional details on how much they ran the engine after the rebuild and their engine preservation procedures. Dan wondered if I might have to put on a fresh oil filter prior to the pre-oiling, but Rhonda assured me that would not be necessary. The bottom spark plugs were removed; the top plugs were installed and ignition leads were connected. I set up to check the prop tracking, following guidelines set forth in FAA Advisory Circular 20-37E. The tracking tolerance specified was 1/4" and my prop tracked within 1/8".


I checked my engine case temps and they were all well above the 40°F required; ready for pre-oiling. The avionics were powered up and the engine page display showed oil temperature to be 70°F. Mags OFF, ran starter for ten seconds; no pressure yet. Rested starter for one minute, then ran another ten seconds; still no pressure. Seeking assurance, I called Gus Warren, who is the DCT fleet maintenance manager and President of EAA Chapter 194 at PTK. He assured me that this was normal; I didn't need to worry about running the starter longer because with no compression it wasn't under much of a load. He did suggest loosening the oil sender fitting before cranking it again briefly to make sure there was no trapped air in the line. I did so, and was relieved to see oil seeping from the threads; the oil pump was moving oil and the air was purged. I tightened the fitting and cranked again; oil pressure built up and stabilized at 38 psi. The process was repeated with the same results; the engine was now pre-oiled. I turned off the battery master and unplugged the engine pre-heater; the bottom spark plugs were installed and all plugs torqued to 35 ft/lbs before reconnecting the ignition leads. I borrowed an open-end torque wrench from Dave Pohl and torqued the prop bolts to 65 ft/lbs. The engine was now ready for its first start on the airframe.


I wanted to get the fuel senders calibrated while putting fuel back into the tanks prior to the first engine run. Jason Smith at Aerotronics offered to coach me on the process as I was still somewhat intimidated by the complexity of my G3X Touch avionics. I really wanted someone experienced to perform this first calibration task while I watched and learned. Based on recommendations I contacted Danny Foxx, who had assisted other PTK builders with their avionics. We arranged a day and time and got started. Although Danny had experience working on Garmin avionics, the G3X Touch interface was different from other Garmin systems and it took a bit of exploring at first. I suggested starting the calibration of each tank empty, then adding calibration points at 5 gallons, 10 gallons, 15 gallons and the full 21 gallon capacity of each tank. After setting the empty points, I added five gallons to each tank. Danny attempted to set the second points but discovered to our mutual dismay that the starting points had been lost and could not be regained. A call to Jason Smith confirmed that we should have done one tank at a time, setting each calibration point until full and saving the entire process for that tank before moving to the other tank. There was no way to regain the empty calibration points; the tanks would need to be defueled again before attempting another calibration. Oh well; live and learn. I wasn't going to bother defueling on that day. Ten gallons was plenty of fuel to have in the tanks for the first engine start; I'd do the calibration after that milestone was reached. I lowered the tail back to the ground and shifted my attention to getting ready for that first start.


I did a lot of preparation for the first engine start. The hangar was cleaned out and rearranged. I captured some screenshots from Steve Thorne's FlightChops video of the first engine start of his RV-14 that included views of the extensive checklist he and Dave Carrick had written for their event. Based on that, I developed my own RV-8 first engine start checklist, adding revisions suggested by Terry Lutz and others. I recruited a ground crew of the usual suspects from EAA Chapter 194. Curt Martin would be Left Forward watch and also handle the fire/com duties. Gus Warren would be Right Forward Watch and handle running engine inspection. Dave Pohl would be Left Aft watch and Harry Manvel would be Right Aft Watch. I also enlisted Scooter Stinson as a videographer, in charge of the external stationary and roving action cameras. I would be pilot in command; also in charge of com and cockpit cam. Just to be thorough, I wrote up crew procedures and passed them out at the chapter meeting. Curt and I discussed the procedures in detail and made refinements. I set up the cockpit cam mount and made a test video that included the first radio transmission from the airplane to PTK Ground. My handheld radio was set up for use with headphones. I also wrote up my own separate pre-engine-start checklist of hangar actions I wanted to make sure I got done that morning. I was ready... or so I thought.


Very early on the assigned morning I went out to the hangar to plug in the engine preheater before returning home for breakfast. I returned at 8:00 a.m. and made sure all items of the hangar checklist were addressed. The crew arrived on time; we had a short briefing before pulling the aircraft out of the hangar and securing it to a tie down ring on the ramp. Despite all my preparation, I found myself a bit nervous as I climbed into the cockpit. A few last minute exchanges were made with the crew. Curt and Gus chocked the main wheels; Dave swept any loose gravel away from the prop and Curt grabbed a cap from my flight bag that would shade my eyes from the southern winter sun. My nervousness increased as I fumbled my way through the checklist and tried to start the engine without correctly priming it. When I did it right, the engine fired right up... and as it started, the remnants of my brain blew away in the propwash. I tried to go down the checklist and realized the G3X wasn't displaying any electrical readings. I briefly tried to diagnose the problem but got nowhere. I felt like Ralphie in A Christmas Story, sitting in Santa's lap and going blank: "Gauge reading? What's a gauge reading?!" I fumbled my way through more of the checklist and tried to cycle the prop at 1400 rpm; nothing happened, but that was to be expected. I shut the engine down and sat there in a daze as my crew applauded. The engine had sounded great, but I was not happy with myself. All the preparation I had done didn't prevent me from choking when glitches were encountered. I realized I hadn't switched tanks; when I did the mag check I had accidentally turned the key back too far and the starter graunched into the ring gear. That distracted me from noting the rpm readings during the check. I had totally ignored my shutdown checklist. That's when I realized I'd never even turned on the alternator master switch. The com didn't work very well; after viewing the videos later I realized my mic was too far from my mouth and much of what I said in the cockpit didn't trigger the intercom so it wasn't recorded by the cockpit cam audio. After checking with my ground crew, I did a restart, tested switching tanks and tried again to find electrical readings on the G3X to no avail. This time I tried to do a better job on the checklist and after doing the assigned tasks I shut it down again. By now some onlookers had assembled and they swirled around the aircraft as I gathered what was left of my brain back together and climbed out of the cockpit. I debriefed with the crew as we inspected the engine. Everything looked good; Gus found one lone oil droplet hanging off the bottom of the prop governor mounting boss. It was wiped off and the boss stayed dry. We took the chocks off the main wheels, untied the tail and after posing for a crew photo I rolled the airplane back into the hangar. The crew talked amongst themselves as I continued to inspect the engine with glazed eyes and a foggy head. Eventually the crowd dispersed; I secured the aircraft, gathered my gear and headed home for beer and rumination. The airplane did pretty well, but I wanted a do-over.


The next day I went out to the airport with a fresh checklist and no distractions. While the engine was preheating I went through the configuration menu on the G3X. I found what I thought were the missing gauge indicators and got them on the display. This engine start up was without chocks or tiedown; I tried to treat it like any normal preflight start with notes taken and brakes checked. It went well enough; I covered all the checklist items all the way through shutdown. I still hadn't gotten any readings on the electrical gauges displayed; I'd need to consult with Jason Smith on this and other issues. A lot more work was required to get the avionics set up completely.


The next major step on the airplane was completing the calibration of the avionics. The remaining usable fuel in the fuel tanks was pumped out to prepare for sender recalibration. I had a phone conference with Jason Smith; he talked me through the procedures as we set the flap positions, configured the voltage and amperage gauges and set various indicator ranges, limits and alarms. He tutored me on the fuel tank calibration process; it's too long of a process for him to remain on the phone, but I was pretty sure I had it down. It's too long and boring to share here, but I did capture the call on and procedures with the cockpit cam so I can refer to it later if needed. I raised the tail, leveled the aircraft and began the calibration process on the left tank, setting the data points in the previously mentioned five gallon increments until the tank was full. I started out using the five gallon fuel jugs and refilling them from the fifteen gallon jugs using a hand pump with both jugs bonded. It became evident that process would take a very long time, so after I emptied the five gallon jugs I used a fuel truck to complete the filling. When the left tank was done and saved, we moved to the right tank and repeated the process; saving after the tanks were full. The fuel truck left; I shut off the battery master, disconnected the ground wires, lowered the tail and pushed the aircraft back into the hangar.


With the aircraft tucked away safely in the hangar, I wanted to power up the G3X and bask in the fruits of my labor. I turned the battery master back on to reboot the system in normal mode. When the screen stabilized, my heart sank. Both tank gauges were still covered with a big red X; the calibration process hadn't saved properly! Now I had full tanks again, and not enough empty jug capacity to handle another defuel. I considered going out and buying a few more five gallon jugs, but instead I called Curt Martin and asked if he had a couple available that I could borrow. He did, and as it turned out he was on his way to the airport when I called. Within a half hour he was at my hangar with two extra fuel jugs and a rattle-ball type siphon hose. He helped me get the left tank empty and I tried calibrating from full to empty during the process and making certain I saved the data points properly. It worked, but the gauge floats didn't behave in the same way during defueling as they had during fueling and I wasn't happy with the way the data plotted on the calibration display chart. Curt left me to finish the process on my own and I recalibrated the left tank as I refilled it in the usual five gallon increments. The left calibration was more accurate; it was saved properly and the process repeated for the right tank. I was able to sight the reading on the scale from the cockpit as each jug was filled and the flow was shut off at exactly 30 lbs. for each five gallons of fuel pulled out of the right tank. When it was all done I had both tanks filled and both tanks successfully calibrated. I lowered the tail again, topped of the charge on the battery and tucked the airplane away again. I was glad that job was finally finished.


It was time to complete and submit the Airworthiness Certification application. I called my new DAR-F Matt Tomsheck; we discussed the current status of the aircraft and I got some clarification on which document files needed to be attached to the online application. He stated the only three that needed to be attached were the completed Applicant's Program Letter, a notarized copy of FAA Form 8130-12 (Eligibility Statement, Amateur Built Aircraft) and a 3-view line drawing of an RV-8. I completed the forms, had Form 8130-12 notarized and attached all to the online application. I completed the final sections of the application, submitted it and received confirmation of submission. I also drew up a chart of my requested flight test region defined by a 50 mile radius from Owosso Community Airport (KRNP). This has worked well for other pilots based at PTK; it provides a lot of uncluttered airspace for Phase 1 work and numerous airports within emergency gliding distance.


In preparation for the airworthiness inspection, I went through a Condition Inspection checklist and began going over the airplane from tail to prop. I found some empennage stop nuts and lock nuts that hadn't been torque sealed; I checked their torque and marked them with torque seal paint. Referring to my notes from Dan Jones' visit I examined the firewall forward area, checking the torque on control cable and lever lock nuts; magneto lockdown nuts and starter mount nuts and bolts. The prop bolts were retorqued and safety wired. Dan and I had noticed that the white hi-temp paint I had sprayed onto the inside of the top cowl was peeling off; we found flakes of it on the engine as well as the floor. I vacuumed the top of the engine thoroughly and sanded off all the loose paint on the top cowl. The bolts holding the canopy frame to the forward rollers still had temporary nuts installed. I disassembled the left side completely; the swinging cam of the midway canopy latch had a tendency to hang up, so I applied dry lubricant, rubbed the parts down and carefully reassembled the mechanism, installing stop nuts on both sides, torqueing and sealing. The cockpit side panels were removed for inspection and the inner edges of the baffles were resealed with Permatex Ultra Black sealant. I also discovered that the forwardmost rivet along the left side canopy skirt had not been properly supported from behind; leaning on the forward bottom corner had pushed the skirt in, breaking the rivet head loose from the skirt and causing a circular crack in the paint. I applied Permatex Ultra Black between the frame tubes and the skirt which supported and stabilized the fiberglass and eliminated any flex.


While the condition inspection was ongoing, I also continued to prepare for additional avionics calibration. I reached out to Jason Smith for additional consultation and followed a lead provided by Terry Lutz to contact Thomas Smith, a G3X wizard affiliated with Beacon Aviation in Grand Ledge. To try and get a grasp of what all might still need to be done, I pored through the calibrations section of the Garmin G3X Touch Installation Manual and made my own list of all the settings and calibrations to be addressed on pages from a shopping list note pad. The completed list turned out to be almost two feet long. When I got to the end of that section of the manual I realized I had been looking at Section 33, which pertained to the earlier G3X system: Section 34 referred to the later G3x Touch that I had in my panel. Fortunately, the sequence of calibrations was the same; only the methods of interface were different. I managed a few easy items such as inputting the weight and balance information for my aircraft. Jason helped me get some of the engine settings corrected. For example, the default engine selection for the CHT and EGT systems was for a single cylinder engine (!); we changed the settings to a four cylinder engine which gave me the correct gauge layout for each. Of course while doing all this calibration, the battery was connected to a trickle charger to keep it charged. I've been told that having the power die while doing calibration, system updates or database updates can be a very bad thing, and to avoid it at all costs.


A couple other pleasant distractions also occurred during this period. I received word from the FAA that my Airworthiness Certification Application submission was officially accepted, which gave Matt Tomsheck the green light to start his wheels in motion and schedule the inspection. In anticipation of the possibility that I might have to tow the aircraft to the compass rose with my Ford Explorer, I fitted the tailwheel pocket jig to the trailer hitch, took measurements and approximated how high the tail would be when the tailwheel was in the jig. I also started work on my own design for a tail lifter that would make it easier to lift the tail up briefly when required.


With the winter weather easing up a bit I thought it might be a good time to get some paint on intersection fairing parts. With the paint booth tunnel still in place it was easy to heat the room from the shop heater, and the smaller parts were easy enough to do in the small space. The metal parts got color coats and clear coats; since the fiberglass parts weren't truly finished yet I just wanted them to get a single color coat for now to blend in with the rest of the airframe during Phase 1 flying. After they dried, I hauled them back to the hangar.


I refit the cowling in anticipation of the first taxi test. I wanted to taxi to the northwest compass rose, seat the brakes, check the engine instruments and perhaps try to cycle the prop again. I also wanted to practice using the ForeFlight checklist as I would for an actual flight. The engine was preheated and I did the preflight walkaround; the right sump leaked slightly after sampling but with some fiddling I got it to reseal again. As I pulled the aircraft out, Curt Martin drove up and we discussed my taxi plan. Startup went well, but the engine stalled just prior to taxi. It restarted well; I got taxi clearance and headed west along taxiway Delta, allowing the rolling speed to build before tromping on the brakes, repeating the process twice more to bed the brake pucks and deglaze the discs as Curt had suggested. Somewhere along the way, the #2 EGT stopped working and displayed a red X. Once in the runup area, I checked readings and controls, turned on the boost pump and switched from the right tank to the left tank. A moment later the engine stalled again, catching me by surprise. I shut everything down, switched back to the right tank and attempted another restart. The engine hesitated to catch; I opened the throttle a bit more and it suddenly roared to life. I throttled back immediately, hoping the sudden start didn't harm anything. After the engine calmed down, I continued the cockpit checks, turned on the boost pump and switched to the left tank again, being very mindful of the detent. This time the engine never missed a beat. I suspect that, without the console cover on with the valve decal as a visual aid, I didn't quite hit the detent on the first try. I called ground and got clearance to taxi back to the hangar. Along the way, I checked the brakes again; they felt good and performed well. I caught a little bit of the taxi back on video with my cell phone. As I shut down in front of the hangar, Curt, Harry and Eric Kirkwood showed up. We debriefed together and they hung out as I put the plane back in the hangar and removed the cowling. I noticed a few drops on the bottom cowl; it was evident that they had come from the top of the dipstick tube as I checked the oil. The rest of the engine was clean and dry. I unwrapped the probe wiring on the left side of the engine and inspected the connections for the #2 probe. All appeared well, but I loosened the barrel connectors, wiggled the wires and retightened them anyway. Another check of the EGT readings appeared normal with ambient temperatures showing on the gauges. I hoped I had fixed the problem, but planned to do more testing. I took care of a couple more firewall issues, resealing the ignition leads in their baffle harnesses with Permatex Hi Temp sealant before calling it a day. I didn't want to refit the cowling yet, but I did place the top cowl over the engine to protect it from condensation that can drip from the roof beams during cold damp weather.


I scheduled a day with Tom Smith to complete the remaining calibrations and updates on the G3X and got to the hangar early to prepare. He arrived a little ahead of schedule and got right to work, starting with a pitot/static VFR certification check. It took him a little while to sort out some leaks, but fortunately they were in his testing gear and pretty soon my system passed. Moving to the cockpit, he updated all the system software first, then I tested the #2 EGT probe with a heat gun. Initial readings looked normal, but as soon as the temp rose the indicator failed again. We talked about symptoms and causes and he concurred with Jason Smith that I should swap probes before ordering a replacement. Uploading autopilot software revealed some glitches; the roll servo software failed to load correctly and the system couldn't find the pitch servo at all. With the pitch servo disconnected, Tom was able to load the roll servo software. He did continuity tests on the connector and it passed; we reviewed the pinout assignments as shown in the Aerotronics schematics and we discovered that the pin receptacle for #2 was actually in hole #3. He disassembled the connector, moved the pin receptacle and reassembled the connector in about a minute and the problem was solved. It was great to have a pro to help with all this; it would have taken me a half hour to do the same job. The battery was connected to the trickle charger while all the work was being done and we suspected it wasn't keeping up with the demand. So we took a trip to the house to retrieve my larger car battery charger and brought it back to the hangar. When we returned, the battery was topped off and we debated whether to tow or taxi the aircraft to the compass rose. We decided to taxi and I installed the back seat so Tom wouldn't have to follow in his car. The taxi went well although the #2 EGT failed again as expected. Once at the compass rose I parked in the correct position facing north and Tom talked me through the calibration process before we began. Unfortunately, engine vibration and wind gusts wouldn't let the fuselage stop moving and we had to shut the engine down to stabilize the aircraft. Tom climbed out of the cockpit and pushed the aircraft around the compass rose while I steered. The G3X told us where, when and how long to stop and start at each 45 degree arc. It was a simple process and thanks to Tom's effort, the calibration was a success on the first try. We taxiied back to the hangar to tend to a couple more details; Tom discussed what I needed to do to update the databases. Some airport friends showed up and we talked a bit before wrapping things up. I wrote Tom a check for the G3X work; Beacon Aviation will send me a separate invoice for the pitot/static VFR certification. I still had a few details to work out for myself, but it was a very productive day and worth every minute and every penny.


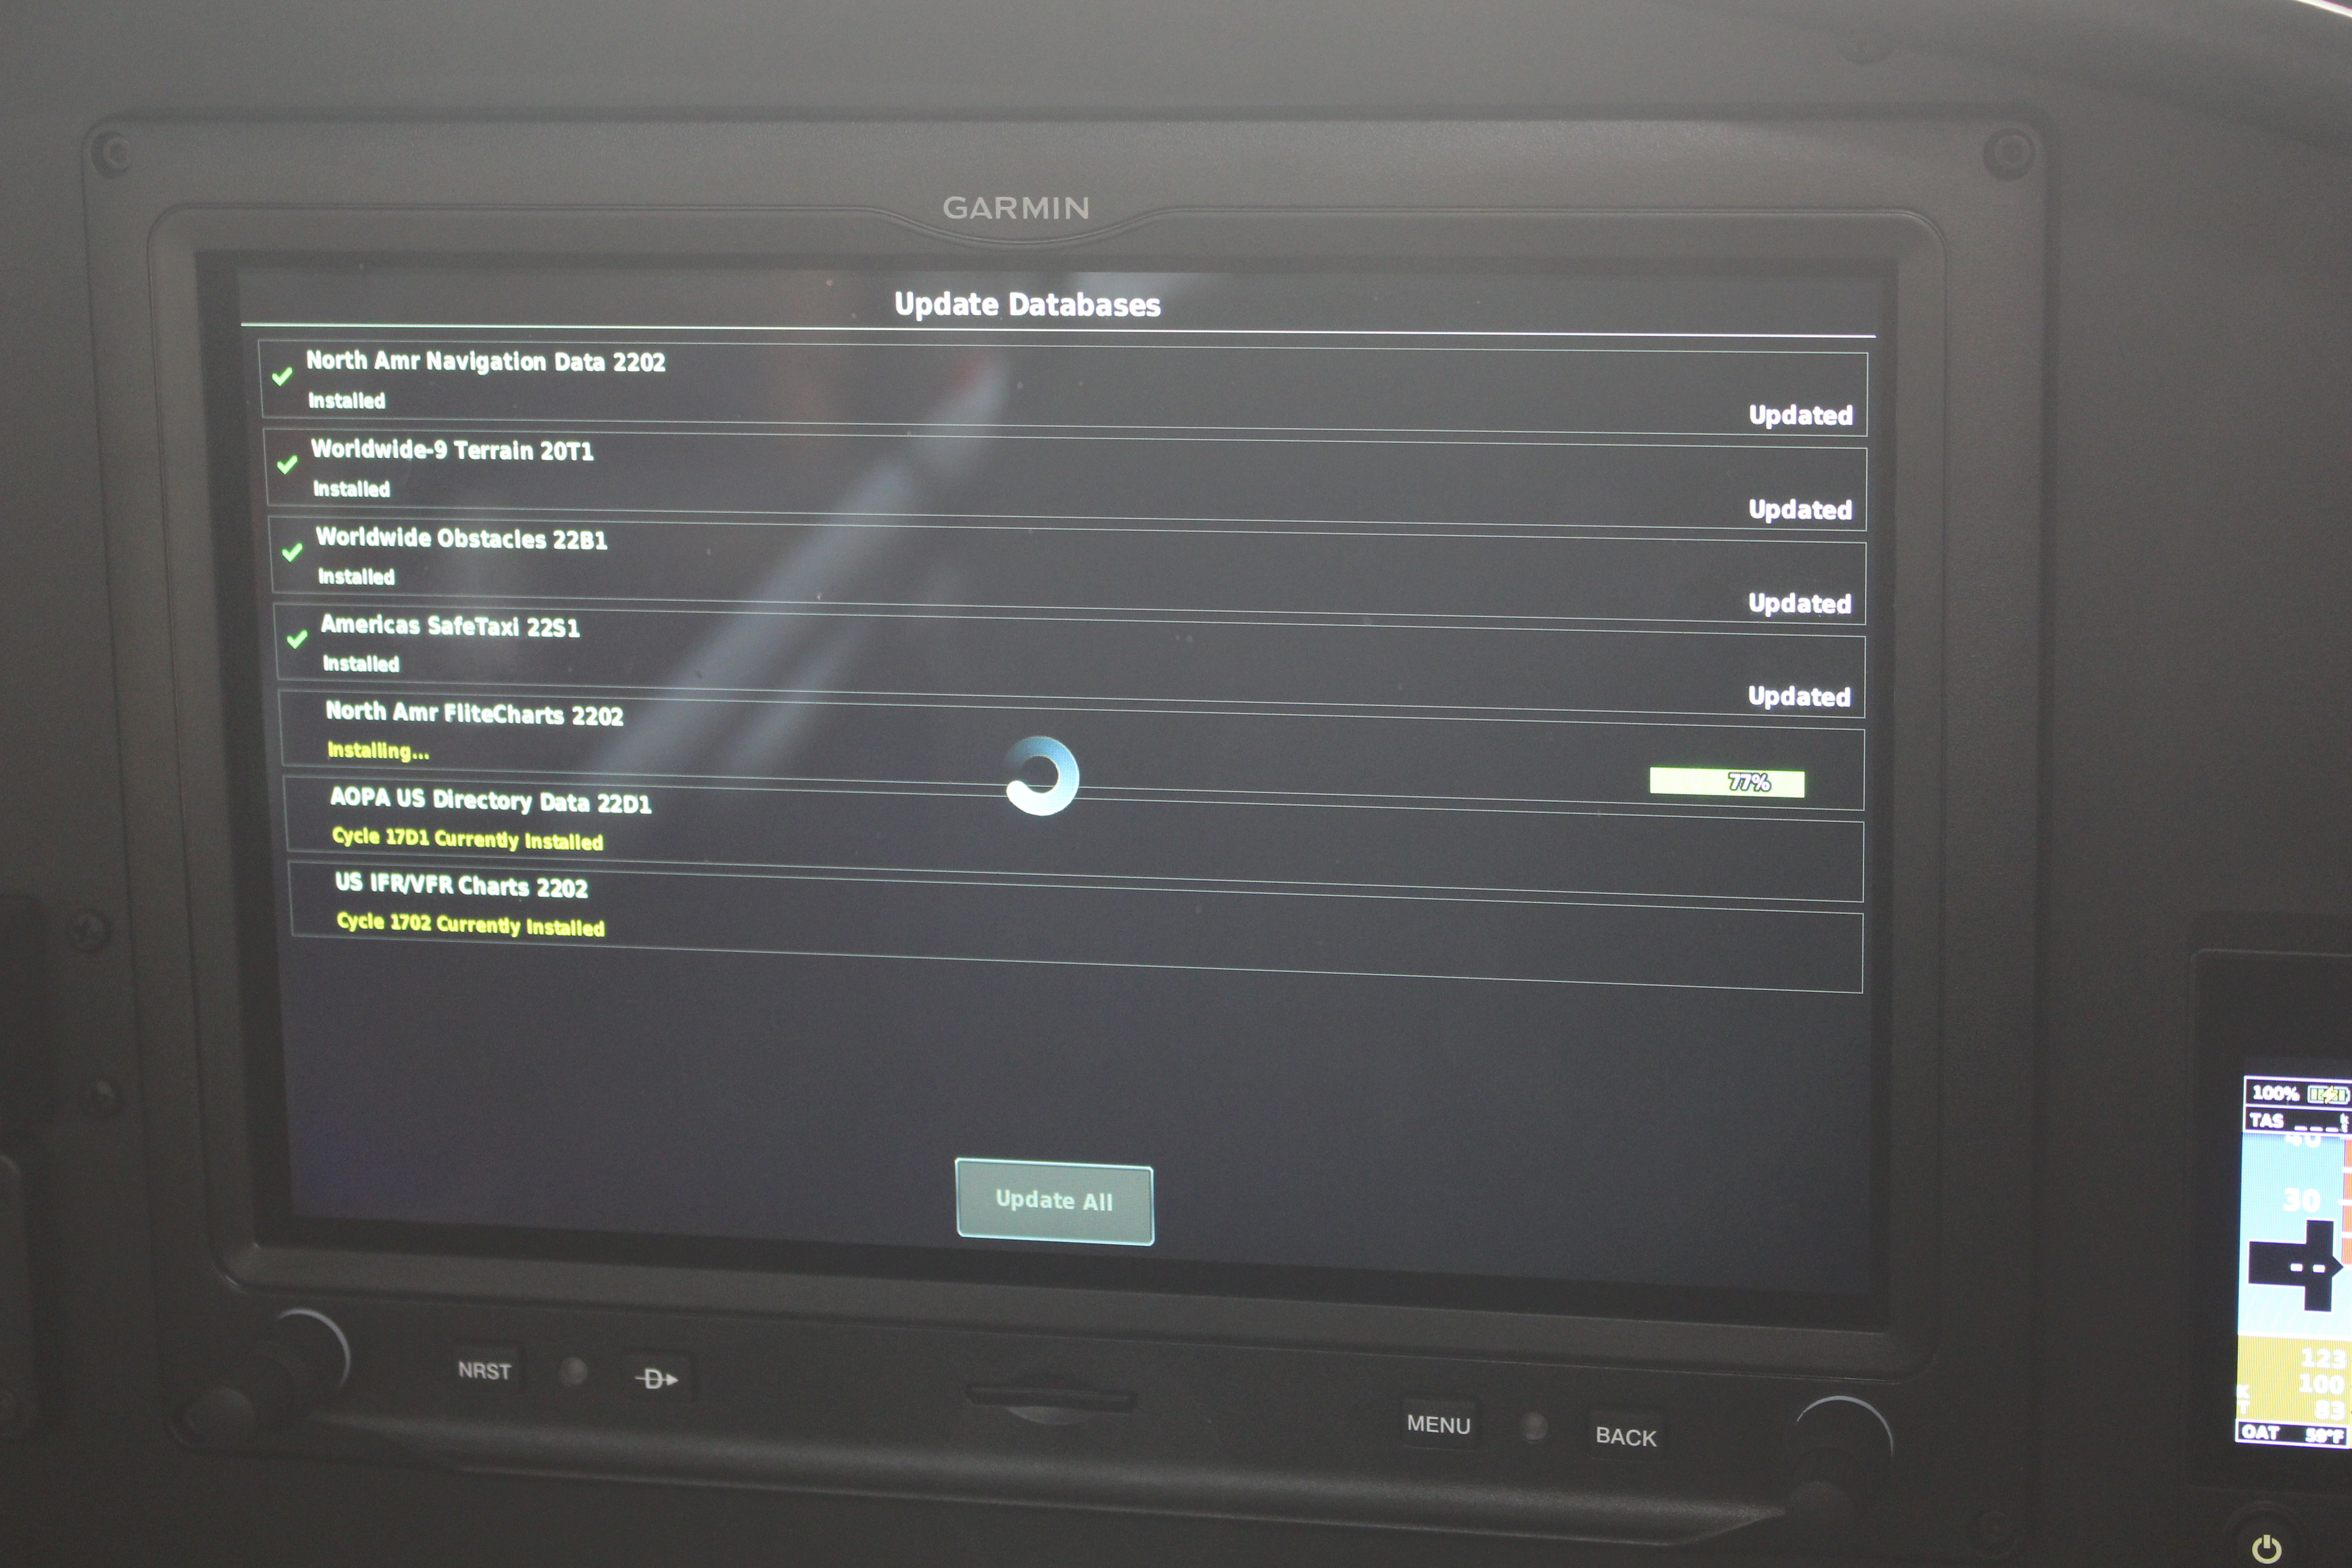
One thing I realized I wanted to have was a proper aircraft time log for writing down the tach, total and elapsed times after each flight. I bought a hardbound notebook and customized it for my needs. In order to update the G3X Touch databases, I downloaded the Garmin Aviation Database Manager app and bought subscriptions to the databases I required. I had to struggle with some firewall issues to get my computer to cooperate (a common occurrence lately) but I eventually convinced my computer, Garmin and Microsoft Edge to play nice with each other. I obtained a 32GB SD card, downloaded the purchased databases onto the SD card, transferred the card to the reader slot in the G3X EFIS, powered up the avionics and the databases automatically uploaded into the system. The subscriptions selected needed to be uploaded in two batches, but it was an easy process and shouldn't be any trouble to repeat as needed.


I talked with Jason a bit more about the EGT probe issue. He checked on the availability of a new probe and found out they were backordered until May. We agreed that I should swap probes and make sure the issue was with the probe and not the wiring. First I retested the installed #2 and #4 probes with a heat gun, confirming that #4 was working and #2 was not. The wiring was unbundled and the probe wires were disconnected. The wiring lengths would not allow the connections to be swapped with the probes in place so they were removed from the exhaust pipes and draped over other wires so the connections could be swapped. When I went to reconnect the wires, I detected the source of the problem immediately. When I originally wired the probes, each pair of probe wires were staggered in such a way that it would be physically obvious how the wires should be connected in addition to the color coding. For the #2 probe, the short red wire and long yellow wire from the probe should be connected to the long red wire and short yellow wire coming from the firewall. When disconnected, I realized that I was looking at two long yellow wires and two short red wires. In other words, I had mis-trimmed one pair of wires and connected them so the lengths matched, but the colors did not match. Somehow in the dim recesses of my mind, I always suspected the issue was my fault and I was embarrassed to think I didn't catch it earlier. But all's well that ends well. I had to re-splice judiciously as I didn't have much slack to work with, but I managed to get the wiring properly connected, routed and bundled again. Testing confirmed that the problem was indeed fixed, as indicated by the gauges. I sent a confession with photos to Jason and thanked him for his help, advice and patience. He didn't bother to respond, probably thinking that discretion was the better part of valor. I was just relieved that the last avionics issue was solved and that I didn't have to pay for a new probe.


Going back to condition inspection activities, I modified a female ground plug and secured it to the right side of the engine mount by the oil dipstick. It would serve as a receptacle for the preheater's male plug, holding it securely in place when not in use. The elevator trim placard that I had designed with incorrect travel labeling was covered with a correct replacement; an additional placard was placed in a better position to be seen by the pilot. The cabin heat knob was also (finally) placarded. I removed the front seat ramps for the inspection; I'll leave the forward floor in place for now and remove it upon request from the DAR. I followed Dan Jones' suggestion and touched up some dings on the engine mount with white enamel paint. It will never be this clean again, and preventing rust on the engine mount is a high priority item.


There were a few more inspection covers that had to be removed; I started with the gear leg pocket covers. The right side looked ok but the left side showed signs of prior seepage. The coupling and fitting were wiped down, allowed to sit for 24 hours and rechecked. No sign of further seepage. The brakes were pressure tested while the test was captured on video; no leaks. The coupling was torque sealed. All the wing inspection covers were removed, as were the aft fuselage side covers. All cover and fairing hardware was resorted.


The baffle plug hardware supplied by Van's never seemed to fit the holes correctly. The holes were bigger than the washers; the shanks of the flat head screws were just a bit too long and the cones of the Tinnerman washers on each side contacted each other before they could squeeze the baffle parts. I sourced some oversized flat washers, reamed out the center holes to fit around the screws and deburred the edges. Combined with some standard AN960-10 washers, the assemblies could now squeeze up tightly to the baffle hardware. Permatex Hi Temp sealant was applied to the lower half of each opening and the screw and Tinnerman washer were inserted from the outside and pushed into the bead of sealant. The flat washers were put on the inside, fitting underneath any overlapping baffle fabric edges and the lock nuts were lightly cinched. Sealant was forced into the remaining gaps between the hardware and baffles; the lock nuts were then torqued and sealed.


I carefully reviewed all of the Van's construction manuals, looking for starred items that had not been completed yet and checked them all off. Only one section left to review: Section 15: Final Inspection and Flight Test. I went through it last night and will continue to refer to it in the coming weeks. The 2022 Condition Inspection form has been filled out and submitted to my DAR. I also sent him photos of the cockpit with the forward seat floor removed, showing the aileron trim system and routing of wires and tubes. He indicated I might not need to remove that floor for the inspection, but if he wants it out I'll remove it.


So that's it... I believe the aircraft is ready to fly. The only things I can think of to do is put the MI registration stickers on the tail and clean it up a bit. I think I'm ready for the Airworthiness Inspection. It's less than a week away, but I wanted to get this blog caught up and posted now. The next post will follow this one quickly... and it will be the most important one of all!
STAY TUNED!