Saturday, February 18, 2017

Wing Stand Mods, Fuselage Stand and Hangar

   After completing inventory, I modified my wingstand for a better fit.  I added a wider spar shelf, about 3" lower and 9" inside of the original.  The test fit went well, so I went ahead and anchored the slings and trimmed the excess.
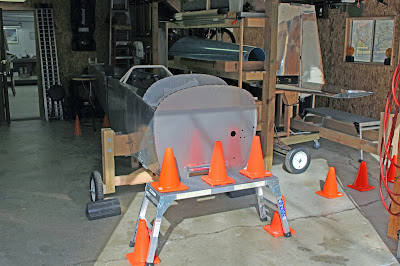
     Now I had to address my requirements for a fuselage stand.  The work stands were suitable for stationary support, but I knew I would need to be able to move the fuselage around by myself, both inside the shop and from the shop to the garage bays.  I don't have a paved driveway leading to the shop garage, so the stand would have to have wheelbarrow tires to handle the rough ground between the shop and garage doors.  I planned another cruciform design similar to the empennage stand, using the plywood inserts in the spar pockets as the main mounting points and a carpeted platform located underneath the passenger seating area to provide aft support.  Instead of a long axle, I would use long wheel bolts mounted through holes drilled in 2x4 axle blocks.  I didn't think a tailwheel caster would be required, so I just made a braced tailskid block sized so that the fuselage would sit level in the stand.  Using 2x4s for the main frame and platform braces would make it simple to attach the platform to the frame with vertical supports on either side.  Once the main frame was finished, I needed to raise the fuselage 10 inches, roll the stand underneath and gradually lower the fuselage, fitting the plywood inserts into the slots in the stand.  It took some experimenting with my cherry picker hoist and some tie-down straps to figure out the safest way to do the lifting, but I did manage to raise the fuselage and get it resting in the front of the stand, with the tail temporarily supported.  I disconnected the hoist and removed it, then carefully lifted the tail to find the position where the fuselage was sitting evenly in the stand without putting any torsion on the plywood inserts.  Once that sweet spot was found, I supported the tail to hold it there, strapped the platform to the fuselage bottom and secured it with 2x4 vertical posts that sandwiched the main frame and platform frame using glue, screws and clamps.  The next day, I removed the clamps and tail support and was pleased to see that the fuselage sat level in the stand.  It was at the same height as it was on the work stands and was easily moved about by hand from the tail.
     With the stands complete, it was time to rearrange things and prepare for wing work.  I had a beautiful day to do this and Dave Farquharson was available to help.  I couldn't resist the opportunity to get some outdoor photos of the main aircraft components in a group.
     We got the tables set up in the shop and transferred the wings back to the tables.  The fuselage, empennage and wingstand were nested into the garage bays, and everything was covered for storage.
     I also reached another very special milestone last week: I am now an airport tenant.  That's been my dream for many decades.  I did have airport access when I learned to fly at PAO and when I was a fuel tech at SJC, but it's been a long time since I had free range access to airport grounds, and I've been missing it a lot.  Training with DCT at PTK helped ease the longing a bit, but I found out the hard way that the other tenants around DCT are very intolerant of anybody walking on their sacred ramp space, and I didn't have gate access to the other GA areas.  But once I got the QB kits in my possession, I was able to get insurance, and with my N-number reserved, proof of kit purchase and insurance, I was also able to get a hangar lease.  I know it will be awhile before the aircraft is there... but I didn't want to take the chance on availability, so I went ahead and jumped at the opportunity.  It's a great feeling to know that I'm finally and officially an airport insider, and will be for the rest of my life.
     The prep work is done; now it's time to get back to building this bird.  To be continued... until complete!

Saturday, February 11, 2017

QB Wings and Fuselage Arrive!

     When I last left you, the delivery had been prepared by Partain Trading Company, and the truck had been loaded at Van's and had begun the journey to Lancair for one more pickup before heading east.  The driver, Don Furr, called me the next day and gave me the ETA of 9:00 a.m. Tuesday February 7.  The good news was that it was a day earlier than I expected.  The bad news was that the weather was forecast to be terrible that day; freezing rain... and it also happened to be our 36th anniversary.  Oh well; we were glad to celebrate the anniversary a day earlier, too.  I put out requests for friends to assist and made the reservation for the utility trailer and furniture blankets I would need for the transfer.  I got the cashier's check made out to Stewart Transportation for the balance due on delivery, and while researching the company information for my vendor's list I learned that the actual name of the company was Stewart Transport.  That turned out to be an important distinction, and after checking with the dispatcher I had to have the cashier's check replaced with another made out with the correct name.  That was easy enough, and it made me glad that I did my homework.
     Tuesday morning I woke up very early and did the last bit of prep work, buying donuts and cookies and setting up the coffeepot in the shop for my crew.  The dawn was dreary and foggy, but the rain hadn't really started yet.  Don called at 8:30 and said he was about 25 miles away; soon volunteers started showing up.  At precisely 9:00 a great big huge truck showed up directly in front of my house and I was surprised to see the trailer painted in Factory Five Racing livery.  I met Don, telling him I was surprised he made it all the way to my house, and explained that the road ahead (marked Dead End) actually did go through, but it was a very rough dirt road.  He was unfazed, and showed me how we'd offload the parts.  The trailer had a built-in ceiling crane with folding extension rails that would allow him to winch the parts out of the truck and onto a large four-wheeled cart that he could use for the transfer.  As it turned out we didn't use the rental trailer at all, and we got all the parts transferred in four trips... or maybe I should call them slips, because by then the rain had started and it was freezing as it landed on the street.  The first section of the course was very slick indeed, but we were careful and stayed safe.  We covered the uncrated parts with plastic sheet as we offloaded them, and thankfully the heavy rain held off long enough to allow us to get the job done without everything getting completely soaked.
     Once the transfer was done, I did a cursory inspection and found everything to be in order and in good condition, so I signed the paperwork and sent Don on his way, thanking him for all his help.  I finally took a moment to take a big breath and relax... it was done... all my big airplane parts were finally here, safe and sound.  We snacked, chatted and took some photos.
     From left to right, my crew was Shunsuke Shibata, Herb Schulke, Dan Strayer, me, my daughter Naomi and Andrew Haines.  Before they all headed out, we got the wings into my wingstand.  I was disappointed that they didn't quite fit the way I expected they would, but it would do for now.

     I managed to get the rental trailer back to U-Haul before my daily deadline so I saved an extra day of rental.  After I got home and had lunch, it was time to begin inventory and take a few photos of my own.  I had to laugh at the way my name was spelled on some items... but I'm used to that.
     Over the next few days I continued with inventory and photos.  I relocated the wings to the garage so that I could make modifications to the wing stand.  I unwrapped the ailerons and flaps to inspect them, then repacked them and put them away until needed.  Inventory of the large parts went relatively quickly, but I did find one part that got scuffed sometime before it was boxed and shipped.  Although it could still be considered serviceable, the scuffed area has probably been exposed long enough that corrosion might become an issue.  I'll check with Van's and see what they say.
     Then it was time to inventory all the bags of little parts.  I've only just begun that stage... but I've a guess how it will go.
     So I've crossed another finish line... so that I can start another race.  Such is life.  But as I've said in other posts on social media, it's official: now I will always have something to do... for the rest of my life.  My future path will cover a lot more ups and downs (see "Such is life" above), but it will be a great journey in any case... and it will all be covered here.
(Special thanks to Shunsuke Shibata and Dan Strayer for taking photos of this event for me)