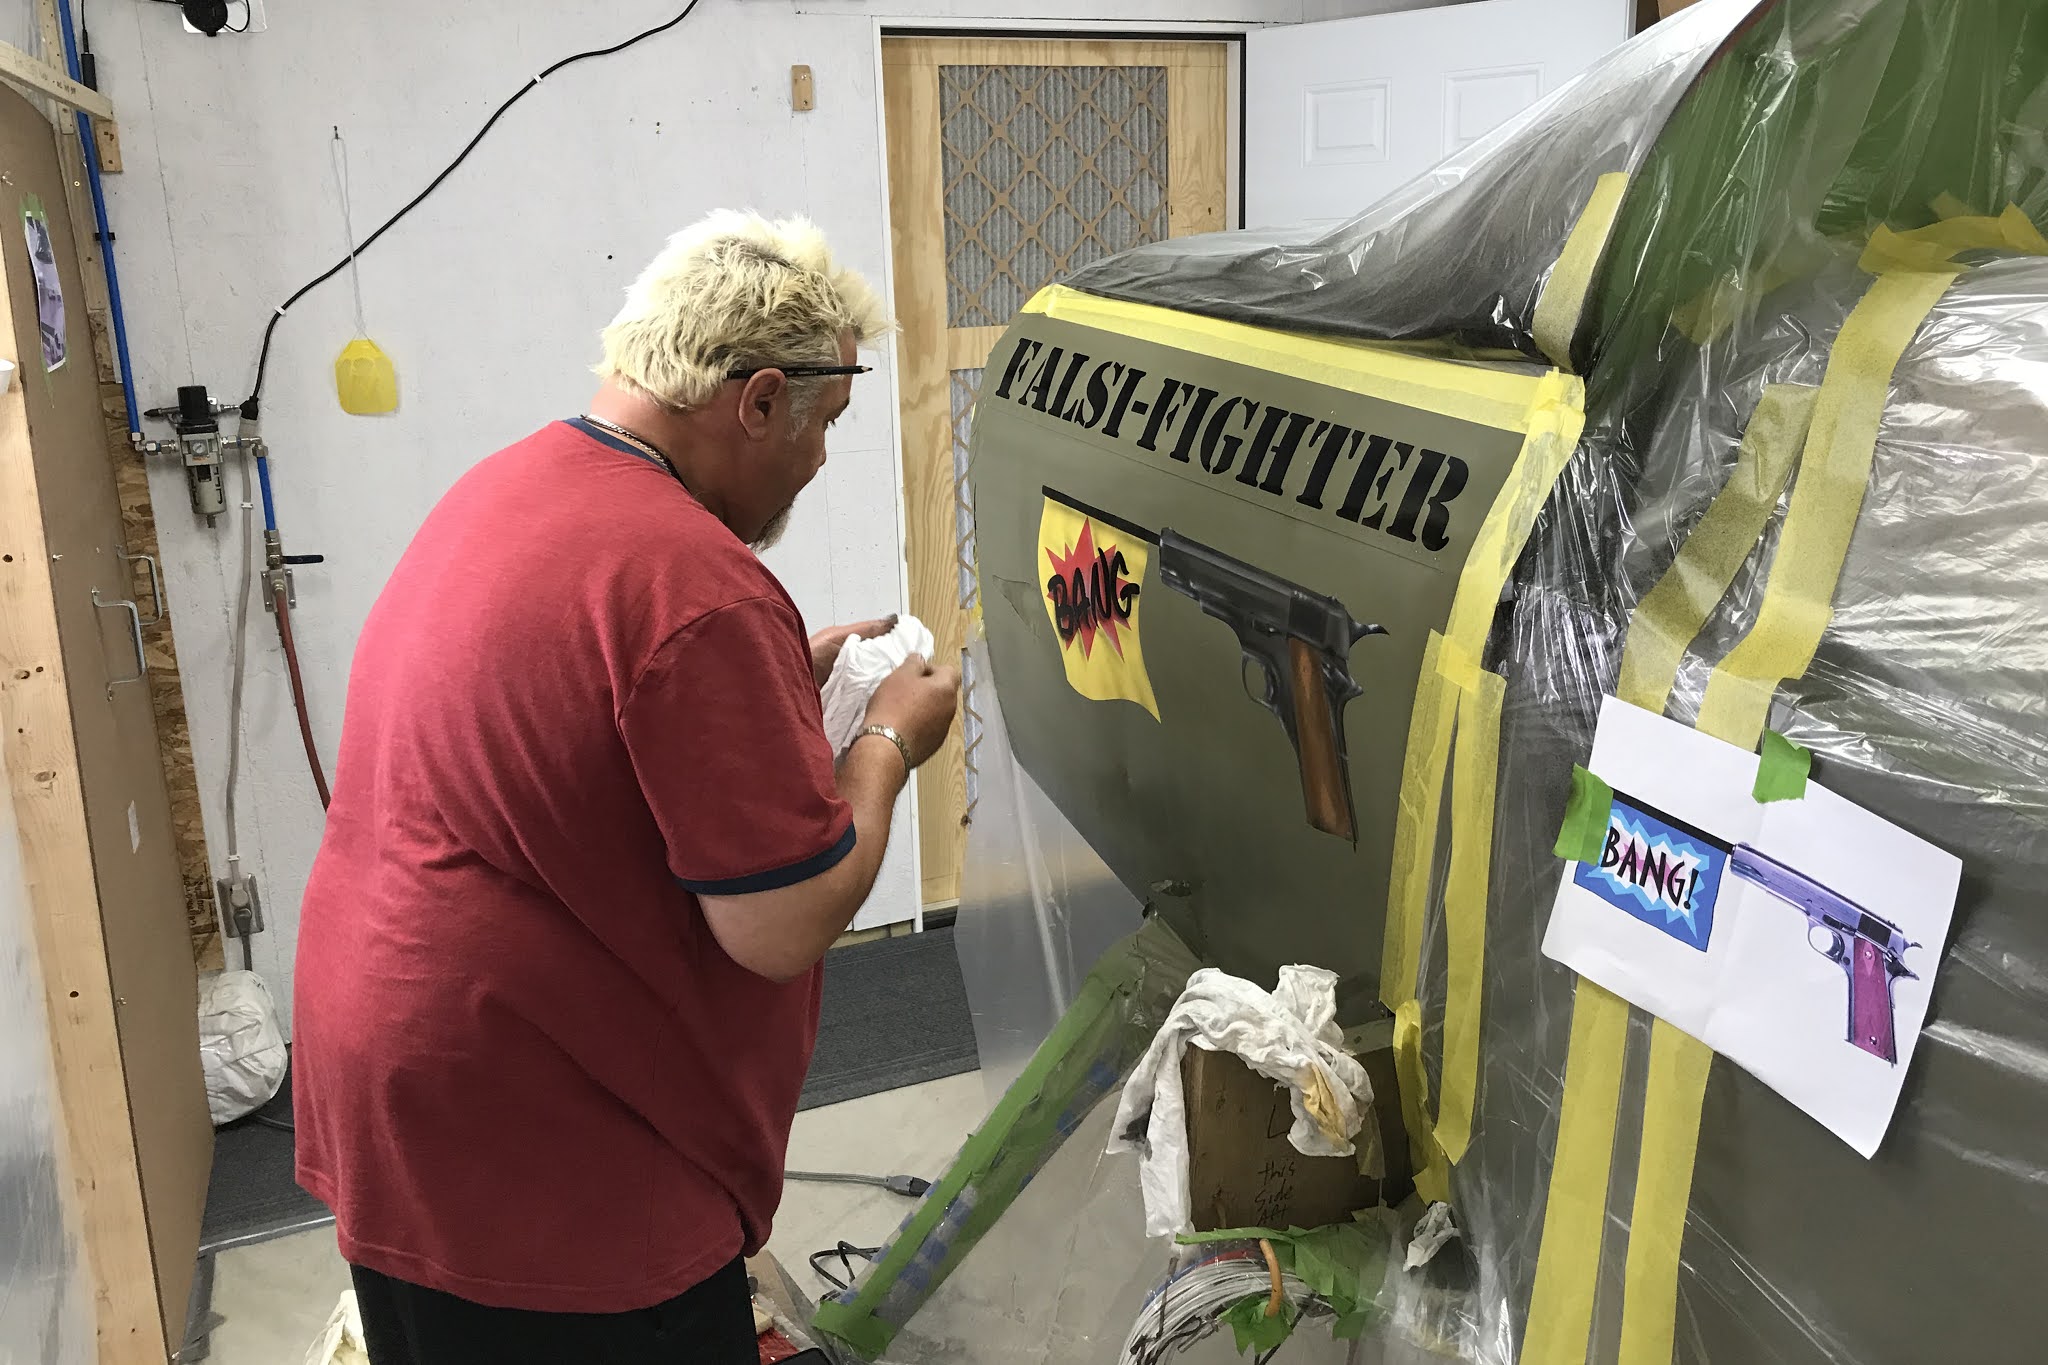
The pace on the project has picked up despite the weather delays. After doing some minor touch up on the windscreen molding I was able to begin the painting process. All the bare aluminum areas were scuffed with red Scotch-Brite pads using an orbital sander. The metal was thoroughly cleaned before spraying the wash primer and primer coats. The first basecoat to be sprayed was the neutral gray to cover the unfinished forward underside. Before applying the olive drab basecoat over the top and sides of the fuselage I had to retrieve a broken stub of toothpick that had gotten stuck in one of my static ports. I had originally used toothpicks to fill the holes during the painting process but (of course) one of them got bumped during sanding and broke off flush. It took some doing to get it out and afterward I used short-cut stubs of broadhead nails to plug the ports to prevent a reoccurrence. After the basecoats had fully dried, I applied the Falsi-Fighter vinyl stencil to the left side of the forward fuselage. The fuselage was masked and the lettering was sprayed with black paint. The plane was thus officially named... and after years of dreaming, it was good to see it actually happen.


It was time for the nose art. I had done research on numerous artists including the legendary John Stahr, whom I mentioned in the previous post. He was the perfect candidate and his price was reasonable but I knew he wouldn't be available during this time window. More inquiries were made through sign shops and custom body shops. A few were found, but they were either too busy or unwilling to travel to my shop to do the work. Eventually I got a referral from Detroit Custom Paint for Joe Lucia. He had decades of experience and came very highly recommended; a look at his Facebook page showed some amazing work. I called him and described my project; he was immediately intrigued and was willing to do it on short notice. A few days later he made it up to my shop with his niece and helper Ariella; as soon as they arrived we became instant friends. Joe is a consummate artist and a good man with a great attitude about life; he gives off the same enthusiasm and motivation as Mike Patey, yet for all his passion he works in a very calm and methodical way. At one point I asked him if he found my presence a distraction. His answer was "Nothing distracts me"... and he was right. In two hours he had my nose art completed... and it was nothing short of spectacular. Exactly what I wanted and the result was far better than I had dared hope. Artistry like that doesn't come cheap, but he was worth every penny... I got some great nose art, and a friend for life whose infectious positivity will continue to improve my own attitude for a long time to come. I captured the creation with time lapse video, and although I had taken measures to extend the battery life of the Garmin Virb camera it still died about fifteen minutes too early. But the final details missed on video were captured in still photos and I was able to produce a documentary of the process for my YouTube channel; see link below. I highly recommend watching a true artist create a small masterpiece in an intuitive, efficient and seemingly effortless manner. I feel honored to have his artwork on my aircraft.


With Joe's work complete, it was time to get on with my own graphics. I started by trimming the vinyl mask stencils to the required size and shape for proper placement. As instructed by Mike at Quality Business Engraving, the positioning was determined and the stencils were taped in place in order to lay down alignment tapes at the corners. The large letter stencils were positioned first, followed by the N-number stencils. With the positions determined and corners marked the backing paper of the stencils was carefully removed. The vinyl was smoothed out with a vinyl squeegee and the top cover paper was removed. I masked the entire fuselage with plastic and cut out sections to expose the large lettering, which was wiped down with wiping solvent. The large letters were sprayed with black basecoat; when dry, the masking was removed and the stencils peeled off. The same process was done with the N-numbers: masking, wiping, spraying white basecoat and removing masking and stencils. So far, so good.


When I prepared to paint the Stars and Bars, I realized I should have done a thorough inventory of the stencils when I received them. The stars and bars required three separate stencils each and I needed four sets of three. It turned out that I was only given one set instead of four. A call to QBE got me three more sets the next day, but when I brought them home and inspected them, I realized that the base stencil vinyl wasn't cut to the precise dimension that was shared by the overlaying stencils. All the stencils had to be cut the same or they wouldn't align. I ended up doing some extra work to make sure I could cut one to the right size and position for correct alignment, using the one correct set I had as a guide. It worked out well enough but I may have QBE make two more correct base stencils when I paint the wings. The first color to be sprayed was the white basecoat. I laid down fine line tape around the inner edges of the stencil to reduce the size of the coverage slightly; that would assure that the red stripe around the perimeter would not have any exposed white lines outside of the red. When the white dried, the masking and stencil was removed, the red stripe stencil was applied and red basecoat was sprayed. After removing the red stencil the final stencil for the blue fields was put in place. It was impossible to tell how precise the alignment was, but it looked very good. After shooting the blue and removing the masking and stencils, there were some slight misalignment flaws that would have to be touched up later by hand with red basecoat before the clearcoat went on.


There were times during the painting process when I was waiting either for paint to dry or humidity to drop, so I found other things to do. In order to paint the wings I would have to devise a method of rotating the wings in the booth. I had seen how others did it, most notably Joe Schumacher in the TV series From The Ground Up, and I revisited my resources to come up with my own system. With Leo Knowlden's help I got the wings onto sawhorses. For the wing rotation jig, I decided to keep it simple. The outboard end would utilize the technique of inserting a 4' length of 4" PVC pipe into the rib holes closest to the main spar, leaving 1' sticking out to act as a pivot point. The pipe placement is close to the center of gravity to make rotation and balance easy. On the inboard end I designed a square plywood fixture that would clamp onto the main spar with cushioned undersized bolts inserted through the spar holes. The square was offset from the spar and roughly centered on the same wing rib holes into which the PVC pipe was inserted. This would allow the square to pivot the wing in balance along a straight axis. Since my aileron pushrods are already installed, I bored 2-1/4" holes into the center of the square that the padded pushrod would pass through. A small safety cone was put on the end of the pushrod and handles were added to the squares to make rotation easier. I assembled receivers onto the top of two sawhorses. The inboard end was a quartet of cleats that formed a slot to hold the edges of the square; the outboard end was a half-circle saddle for the PVC pipe that was designed to hold the wing level with the plywood square nested in its cleat slot. Testing showed that the PVC saddle had to be relocated to the inside edge of the sawhorse crossbeam to allow the aft corner of the wing to clear the sawhorse legs. At the inboard end, the obstruction was much more pronounced. The only easy way to create clearance using the existing setup at the same height would be to build new offset support legs that could be designed and assembled around the existing jig, then remove the stock sawhorse legs from the new assembly. Fortunately I still had enough scrap wood available to do this, and the result turned out to be easy to build and worked better than expected. The only tricky part was getting the wing off the sawhorse and supported while the new legs were fitted. The rotation jig was tested on the left wing; to free up additional supports I had to get the right wing off of its pair of metal sawhorses and onto a long table. One of the metal sawhorses could then support the inboard end of the left wing while the inboard jig sawhorse modifications were completed. It was worth the extra effort; I now had a wing rotation jig system that was simple, safe and easy to use. Due to booth constraints I would have to paint one wing at a time. Both wings were fitted with squares and PVC pipes, but I would only need one set of sawhorse supports.


Before the wings could be painted, the fuel tanks needed to be pressure tested. Opening up the padded manila envelope that had held the testing components out of sight for years on my parts shelf revealed a couple disappointments. First there was only one set of fittings, so I couldn't test both wings at the same time. Second, I found factory-made fuel pickup tubes that I thought I was supposed to fabricate according to instructions on the plans. There were other fuel line components that I thought had gone missing that I had replaced. Oh well. It had become obvious awhile back that I would have parts left over when the airplane was completed... what's a few more? A balloon and a Schrader valve are used to lighly pressurize the tank at about 1 p.s.i.; the balloon also acts as a safety valve to prevent overpressurization that could damage the tank seal. Because they expire over time, the balloons were not included in the kit. At first I tried to use water balloons, but those turned out to be way too small and weak for the task. Better balloons were obtained and I also made up an adaptor tube fitting that would make attaching the balloon to the tank vent plumbing much easier. Once the balloon was inflated, the Schrader valve was capped and a paint stir stick was taped to the wing while resting lightly on the side of the balloon; this would provide an easy visual clue to any slow deflation. Seams and rivet lines are sprayed with soapy water to check for bubbling caused by leakage. The left wing was tested first, and it failed; leaks were found around the balloon nipple and the tape sealing the filler cap. Testing the right tank was successful; after 24+ hours no discernable balloon deflation indicated no tank leaks. Retesting the left tank numerous times was inconclusive. The balloon would hold air well for about 12 hours, but get gradually softer after that. Different balloons displayed different characteristics, but no leaks were found along rivets and seams. There are a lot of reasons why this might be occurring and some of those reasons have nothing to do with tank integrity. For now, testing the left tank has been halted, but more tests will be conducted prior to painting. The left wing was moved over to the right garage bay next to the right wing and the paint staging area rearranged. This cleared up the left garage bay to store the finished fuselage once painting was complete.


Returning to painting, I checked with Sal Gomez at Sherwin-Williams to find out the best way to mix a small batch of red basecoat for fine brush work. After mixing as directed, I did the touch up on the Stars and Bars with the assistance of some fine line tape to keep me from screwing up. When a good weather window presented itself, the finished basecoats were wiped down with wiping solvent and the clearcoat was applied. This was almost a disaster as I had made the rookie mistake of mistranslating ratios while mixing a double batch. I caught my error before finishing my first coat. Subsequent batches were mixed correctly and two heavy coats applied. When I finished spraying the second coat I called Sal again and asked him about the error. He said not to worry; the ratios I used would only result in a longer drying time. Instead of a couple hours, I should give it a full day to cure. The next day I inspected my work. The finish was good and hard, but there were numerous runs in the clearcoat. I had purposely done heavy coats, wanting to avoid undershooting as I had on the vertical stabilizer. This was probably a wise call. The runs can be dealt with, and the finish is solid. Phew!


With the clearcoat cured, the fuselage could finally be removed from the booth and stored in the left garage bay to await transport to the hangar. The baffles, fan unit and door plug were dismantled and the fuselage was rolled out of the shop garage door. It was great to get it outside, stand back and look at the finished paint job. Perfect? Not even. Still beautiful? Definitely! Joe Lucia had told me that there was metalflake in his paint that wouldn't be visible until it was clearcoated and displayed outside on a sunny day. He was right... it looks fantastic. I couldn't resist pulling it out of the garage a time or two over the July 4th weekend and posing it by the flag hanging by my porch.


I had originally planned to paint the wings after the fuselage, but after further consideration it seemed more efficient to finish the canopy next and install it on the fuselage before moving the fuselage to the hangar. The fan unit, door plug and baffles were reinstalled, the booth was resealed and the canopy and support stand were carefully squeezed through the shop/booth door. Masking the canopy and stand was a complicated task that took many hours. Some minor filling was done on a few obvious voids before the first coat of primer was sprayed. I had researched how other builders handled fiberglass pinholes prior to painting, but I knew the Sherwin-Williams primer could be used as a high-build surfacer, so I didn't skim epoxy on the surface before priming. This was a mistake; lots of pinholes became evident after spraying the primer. I sanded the whole skirt down and used Aeropoxy Light filler to fill the pinholes and other low spots before spraying another coat of primer.


That did the trick; the surface wasn't 100% perfect but it looked good enough to go ahead and spray the olive drab basecoat. After it dried, the rescue stencil was applied to the canopy latch area. The canopy was masked and the rescue stencil was sprayed with red basecoat. When that dried, the masking and rescue stencil were removed. Determining the layout of the pilot/co-pilot stencil was a compromise; if I lined it up with the either the bottom or top edges of the skirt, it didn't look right because the skirt expands vertically from fore to aft. I split the difference and tried to keep it centered between the edges as I applied it; it seemed like the right visual compromise. The canopy was remasked and the stencil was sprayed with white basecoat. Removing that stencil was tricky as some of the vinyl sections were very thin and delicate. They tended to break off of the main stencil body as it was being pulled off and they had to be removed very carefully with the sharp point of a drawing compass and tweezers.


Progress continued to be slowed by high humidity and other distractions. The CAF brought its AirPower History Tour to PTK again, arriving July 6 and staying through July 11. They brought in the B-24 Liberator "Diamond Lil", the P-51 Mustang "Gunfighter", a T-6 and a Stearman. The B-29 "Fifi" was part of the tour but they couldn't bring it into PTK because the longer runway was closed for construction; it was scheduled to operate out of YIP but maintenance issues cancelled that stop altogether. At PTK they were open to the public for tours and rides from Thursday through Sunday. This coincided with my birthday so I purchased two rides in the Stearman for Thursday morning. The weather was bad on Thursday so my flights were cancelled. At least I was able to get some of the painting done that day. Friday was a beautiful day and I spent all day at the airport. I checked in with the CAF in the morning; my flights were scheduled for that afternoon so after taking some ramp photos I headed to the north side hangars and waited to capture video of the aircraft taking off and landing, visiting with other hangar buddies between flights. In the afternoon I headed back to the terminal and waited for my chance to fly, taking more photos and videos and exploring the interior of the B-24 as mechanics worked on the Stearman to try and correct an instrument issue. They worked into the evening and eventually had to cancel the flights again. They offered me a chance to switch to the T-6 on Saturday, but I had plans that had already been rescheduled once because of the rainout Thursday and they couldn't be moved again. Sunday would be another bad weather day, so I ended up getting a refund on my flights. As it turned out, the weather prevented them from departing until Monday. Despite the delays and cancellations, I enjoyed my visits with the CAF crew and their aircraft. I look forward to the next opportunity to support the AirPower History Tour during future visits to PTK.


While still waiting for a break in the humidity, a couple more minor tasks were performed. I had always planned to have a white prop spinner with a black spiral on it. The spinner came with white primer on it and I debated whether to paint it white with the black spiral or just use a large sharpie to mark the spiral onto the existing primer. It seemed simpler to use the marker; I could do that quickly in the current conditions and I wouldn't have to worry about upsetting the balance of the spinner with the weight of additional primer and paint. I used fine line tape to lay out the spiral and colored it in with a huge black sharpie marker. The ink bled beneath the tape in a couple spots, requiring some touch up. The finished spinner had some imperfections but it seemed good enough for now. I can always chose to paint it properly in the future. I couldn't resist making another silly little video of the process:
Spinner Spiral Video It dawned on me that with the fuselage painted, I could finally rivet the data plate in place. I chose the usual location on the left side of the fuselage underneath the horizontal stabilizer. Another quick job and minor milestone completed.


Still waiting for relief from the humidity, I made arrangements to rent a flatbed trailer for hauling the completed fuselage to the hangar and set a tentative date for the move. I had a brief weather window that allowed me to get the clearcoat sprayed onto the canopy skirt. With that done, the aft pull knob was installed permanently and the canopy was ready to go back on the fuselage.


The humidity returned and there were a few more distractions that needed attention while the clearcoat cured, but I did manage to get a couple small jobs done. The aft fuselage inspection covers were deburred, final drilled and dimpled and more 3M AC-251 sealant was added to the seam between the windscreen and support hoop.


The canopy and stand were removed from the paint booth and James Turner assisted in setting the canopy back onto the fuselage. The canopy latch was reinstalled and tested. The masking was removed from the windscreen and the canopy and the fuselage posed for more photos. Another weather window allowed me to prep and paint the forward baggage door and aft fuselage inspection covers. When the clearcoat cured, the baggage door was reinstalled on the fuselage and the seats were put into the cockpit. The fuselage was now ready for the journey to the hangar.


I rented a long flatbed trailer from Chet's Rent-All in Waterford, brought it home and pondered the best way to load the fuselage. Since my trailer hitch was set a bit low for that trailer, the rear end was kicked up a bit, making for a steeper ramp angle. It occurred to me that it would be fairly easy to load the trailer from the side with the ramps at a shallower angle and a practice run showed the idea had merit. I documented the process in time lapse video using the Garmin Virb camera. Using my Tail Picker tow bar, I pushed the main wheels up the ramps and onto the trailer with the tailwheel on the ground. Then I lifted the aft end up by the tailwheel spring and carefully pivoted the fuselage to face aft, setting the tailwheel down on the forward end of the trailer. That placement put the main gear in a good location for using the tie down rings built into the trailer floor. The shape of the tops of the Grove airfoil gear legs provided notches that held the upper ends of the tie-down straps securely in place; the tailwheel spring was then tied down to anchor points at the forward point of the trailer. I strapped the ramps down underneath the fuselage and after relocating the Garmin Virb to the roof of my Explorer and taking some still photos, I was on my way to the airport. I planned a longer route to avoid road construction; it provided the smoothest pavement and the fewest turns which resulted in a trouble-free journey. As I entered the north hangar area and headed toward my hangar I noticed that Curt Martin was working on his Long-Eze; I couldn't resist passing by his hangar, honking and waving. He joined me soon afterward and assisted in the offloading, which went quickly and smoothly. With the fuselage now at the nest, I returned the trailer and headed home to celebrate the milestone with a few beers while processing the photos and videos into a movie that I posted on my YouTube channel.


This achievement ushers in a new phase of the project that will see more work being performed at the hangar. It will be necessary to relocate a lot of tools and shop equipment to the hangar; that has to be planned out carefully. The next construction steps will be finishing and painting the cowling, wingtips and wheel fairings. The ailerons will be painted as a set; the wings will be painted individually, starting with the right wing. The flaps will have to be fitted and trimmed to the fuselage before painting. The empennage intersection fairing will have to be fitted at the hangar and finished at the shop. Then comes final assembly. I don't yet know when my engine will be rebuilt; I hope I won't have to wait much longer. I will not be attending OSH this year; I need to apply that funding to my transition training with Bruce Bohannon rescheduled for the first week in October. Still hoping to be airworthy this year; it's gonna be a whirlwind summer. Stay Tuned!